Showing posts with label craft night. Show all posts

3.31.2016

welcome to here.

My front porch was looking a little sad recently. The three small Christmas trees bushes I planted back in December were LONG DEAD.  Like, if anyone had a match close to that porch, we'd have burned the house down. I had a pair of skis zip tied to the railing, and the light bulb in the front light fixture blew out. And I had a Christmas wreath still up. A Christmas wreath.

It was time for a change. I'm pinching pennies a little recently. I ended up quitting my job, and now I'm working part time at various places. While I absolutely LOVE IT, I still have to be wary of my spending. Especially since I just blew a ton of the money I didn't have on a family vacation. Which brings me to my latest craft to spruce shit up: DIY spring wreath making.

For my cheap supplies, I visited the local Dollar Tree. Seriously folks, if you need wreath supplies, don't go to JoAnn or Michael's, or even AC Moore. (I love those stores though, don't be mad at me craft stores, I'm only trying to create things cheaply.) I found a bird and some fake flowers, all for the staggering price of $2.16. (Philly tax, ya'll.) At home, I had a bunch of yarn left over from my Poofball Flowers and some Scrabble letters from who the f*%$ knows where. I found some foam in the basement. Plus I had wine. All of these things are magical. Here's what choo doo.

Step 1: Cut a wreath out of foam.
Step 2: Wrap the foam in yarn. This takes a while, so pour the wine and put Portlandia on Netflix. When you run out of that color, just keep going with another one because who cares?
Step 3: Adorn your wreath with cheap flowers, a bird, and Scrabble letters.
Step 4: Hang your wreath and marvel at the awesomeness it is.


9.09.2015

t-shirt quilts, part DUEX

From where we last left off, I had finished stitching together all of the t-shirts into two lovely quilt tops. I hate to say but I barely documented part DUEX in pictures. I was sew busy. Heh. … ok, lame joke.
SO! Choosing a batting… You want to be sure that you find one that matches the project that you’re working on. A flatter, less puffy batting is great for quilts that you want to be… well, flat and less puffy. Especially ones with intricate designs. I chose a really nice medium puff batting, because of two reasons. 1) The t-shirts and backing material had a little stretch to them. The puffiness of the batting would help this irregularity when I stitched it together. 2) WHO DOESN’T LIKE PUFFY QUILTS? You? Well, you're un-American.
PUFFY!
Luckily, the backing fabrics that I chose for both quilts were W-I-D-E as H-E-L-L. So I didn’t need to stitch two pieces of the backing together. To cut the backing and the batting to size, here is the easiest thing to do: Find a floor. Put the backing fabric on the floor, and secure it with masking tape so it stays put. Next, lay the batting on top, followed by the quilt top. Secure all that shiz together with long quilting pins or safety pins. (I use quilting pins... I have no tolerance for safety pins, plus they're too bulky.) Lastly, cut the backing and batting about 6” bigger than the quilt top. This gives you a safe zone in case you f*** up.

Here’s the tricky and painful part. You will now stick yourself with so many pins. SO. MANY. And not just on your hands. The quilt literally lays on your lap while you’re trying to machine stitch it. It’s like trying to lay down with a needle filled blanket. Very ouchI start by machine stitching the long columns of the quilt. Then, stitch the rows. Since the rows are irregular, I usually will pick up the needle and foot, move to the beginning of the next row, and sew on. 

turns out, it's a real thing.
Next comes the binding… Binding is tricky, but once you get the hang of it, it’s… just less tricky I guess. I cut a continuous piece of fabric 2.25” wide, press it in half, then sew the raw edges to the edge of the quilt top. You then cut off any excess batting and backing fabric…. Then you have to hand stitch everything shut. It takes a LONG TIME. And your hands will not thank you. But it’s worth it, especially with wine that you CANNOT SPILL ON THE QUILT. If you're a spiller, then put your wine in one of those toddler sippy cups.

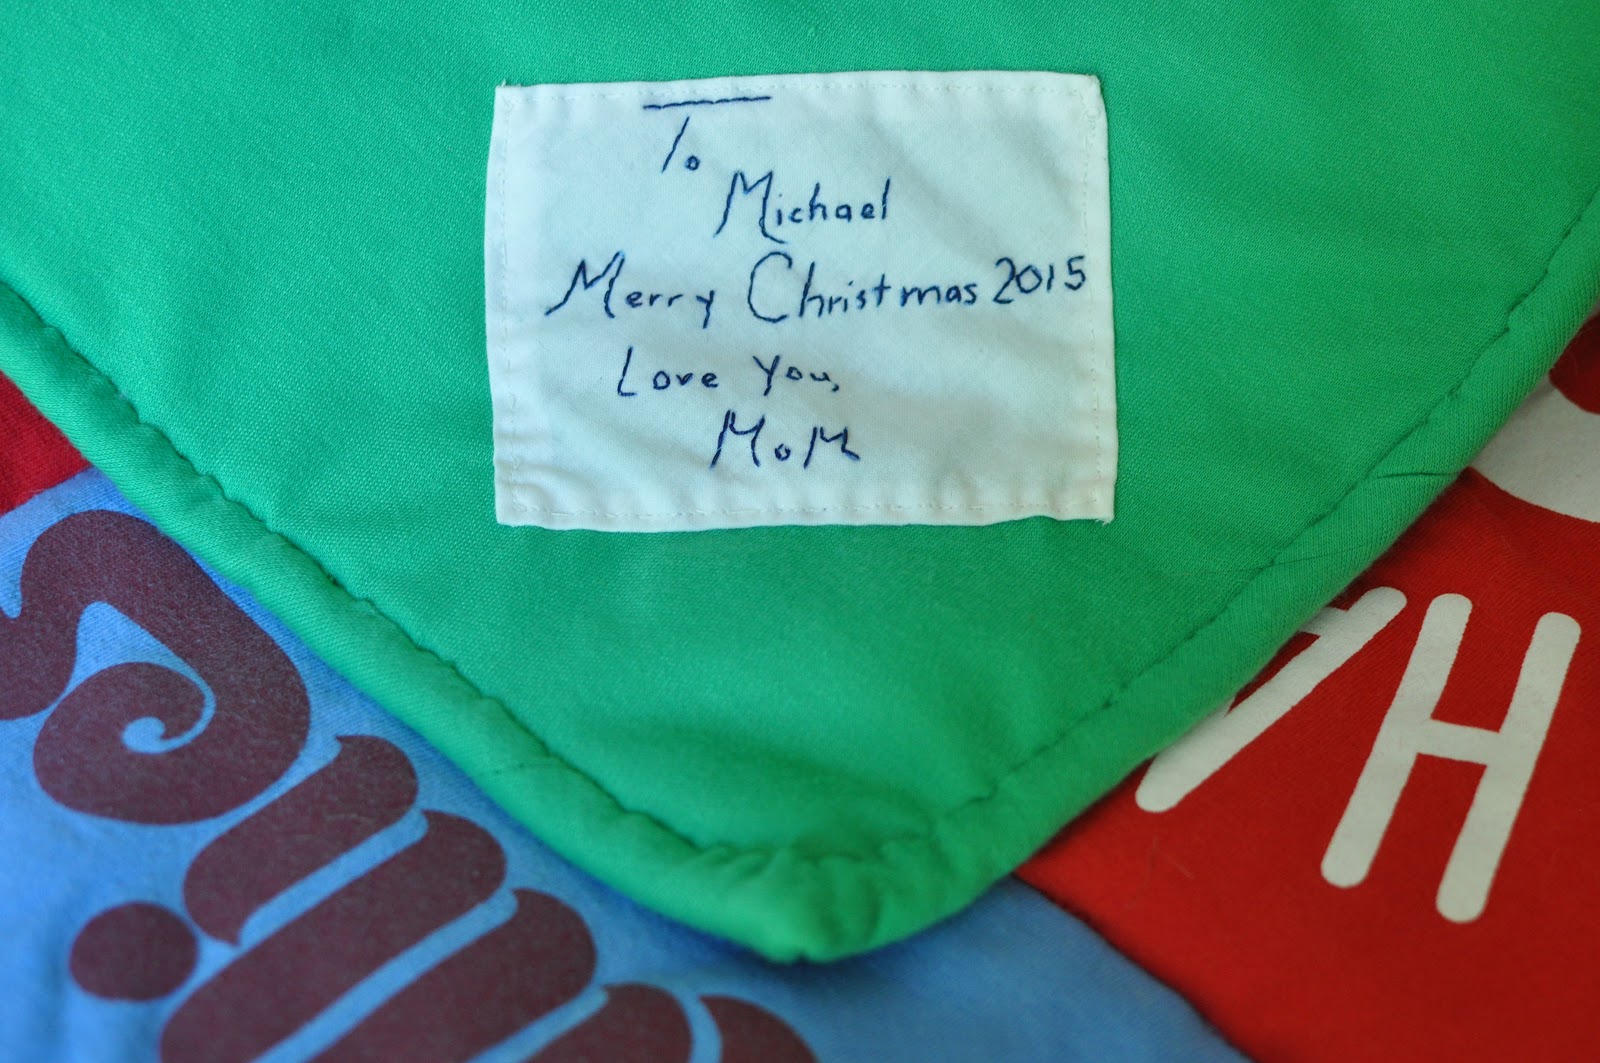
To add a personal touch, I asked my friend to send me (in her writing) a message for each of the quilts. I printed it out, then used graphite paper to transfer her message to white fabric. I then hand stitched her message and sewed this on to each quilt. So that’s it! Two quilts finished. I hope they surround their new owners in years of love and comfort. It was such a cool project, I’d be totally willing to do more of them in the future!!! 
 

9.18.2014

the spirit.

Time is going by too quickly if you ask me. I tried desperately to go to sleep early tonight since I've been feeling under the weather for about... oh 3 weeks (COUGH!) and a thousand thoughts were going through my mind, mostly all related to fun dental things. Did I sort through all of my papers for my rotation tomorrow? did I finish all of my journal entries? do I have all of my things in the car that I need for tomorrow? should I have stayed up later to study? will I remember everything from oral path today? can I make it through another week of clinic with another 5 quizzes next week plus tutoring others? and so on... and so on... and so on... 

I have been so wrapped up lately in everything surrounding school and attempting to excel in the field, that I've completely neglected my life. I've neglected friends. (Sorry friends, I promise to be fun again.) I've neglected my fun little art blog. And I've neglected writing. (HA. I should clarify, I've neglected writing about art, I've written TONS of papers, some of which were friggin' unnecessary to write.) Needless to say, I kinda lost the spirit. My spirit. That made me sad.

So instead of going to bed depressed, I decided to get up and write a little damnit. And craft a little, damnit! Because why not? As much as I love school right now, I need to distance myself both mentally and physically. So I'm going to aim to make one night a week my craft night.

Tonight's project? 
Modifying a glitter painting I did a while back with a cast of my teeth from Perio Lab.  OK. I said I would try to distance myself. I'M TRYING, OK?! Back off mang. It's a work in progress. I'm not sure where it's going, but it's better than going nowhere.


In the meantime, enjoy this note from my dad to the tooth fairy from when I was a kid. I'm not sure which tooth was my lucky tooth. We may never know.


2.19.2013

obligatory wedding craft DIY post part 2

So on to the place cards. I accidentally purchased ones that are more like business cards, and less like the tenty-ones that I thought I was buying. My bad. I wasn't going to return them back to Vistaprint, so I had to find a solution to my little problem.

 
So I did what anyone else would have done: I Google'd it! I typed in place card holder and the one solution that caught my eye was a holder made from a wine bottle cork. Can you believe though, that some people on Etsy are selling them for upwards of $1.00 each? You and I both know that's a whole bunch of bologna. I can do that for way, way less. Actually... maybe I can ask Lou to do it for me since he's handy with tools and loves spending time in the garage...

BINGO.

I found some pretty cool online tutorials, but I thought I'd share my own below.

Wine Cork Place Card Holders
1. Buy 100 bottles of wine (remember, you'll need one bottle per guest!)
2. Open and drink 100 bottles of wine. Save the corks if you're not too drunk to remember this step. Keep drinking until you have enough corks!
3. Take 4 weeks to sober up, and/or be released from the hospital.

Or you can...
1. Go on EBay and purchase a bulk bag of 100 corks for $10.00.

I wouldn't recommend the first set of instructions unless you want to spend a lot of money or become a raging alcoholic.


Now, take your corks one at a time, and set them up in a vice-grip if you have one. It is much easier than trying to hold all the corks while trying to cut them. Cut off the bottom 1/3 of the cork and discard. Run a piece of medium grit sand paper over the cut surface. Finally, make a slit in the top of the cork deep enough for you to insert your place card.

VOILA! YUR DUN. And all for $10! With that extra $90, you can go buy many cases of vino from Total Wine!


2.18.2013

obligatory wedding craft DIY post, part 1

Yes, I know I said that this wasn't going to become a wedding blog, and I promise that it still won't. I'm not going to get all omg look at these wedding favors (ERMAHGERD LERK ERT THERS WERDIN FERVERS!!) up in here. But there have been so many crafts that we're doing for WDay, that it would be impossible to ignore all the fun we've been having. We're literally crafting our poof balls off.

You may remember a while back I was making a ton of yarn poof-ball flowers in anticipation of using them for as my wedding flower boquet. Well... the idea was ultimately vetoed, so I decided to just use them as decoration instead. Luckily, back in November whilst on a Pocono hike, I found A TON of discarded bottles in the woods. There must have been hundreds of them. So, like any good  hoarder environmental enthusiast, I loaded up those gross, mud caked bottles into the car and carted them home. After giving them a good soaking and shining them up with Windex, they looked like brand new. AAAAAAAAAAND I had the perfect vessels for my poof flowers! Some bottles still had gook and goobers inside, so I cleverly wrapped twine around those sections, disguising the grossness.

That was my Saturday project. I had to make a couple more poof flowers, so it took me a little while to get all 15 of the bottles done.

On Sunday, I made the 'guest book'. And by 'guest book' I mean, matted picture frame. When it comes to guest books, there's about a zero percent chance that I'll ever sit down to peruse a guest book. We framed up an 8x10 picture that we took in front of the Golden Gate Bridge with a 16x20 mat. I used some old Scrabble letters, some wire and decorative beads to label it as the 'guest book'. Not too bad for a couple hours of crafty work! Tomorrow I'll post about the place card dilemma and solution.

10.23.2012

sew whaaaaaaaaaaaat?

I had an amazingly productive craft session last night thanks to the stimulating combination of getting my sewing machine back from the shop, sweating it out in an awesome gym session, and being scared s***less from watching The Walking Dead. Between the feelings of excitement, exhaustion and adrenaline, I was wasn't even friggin' blinking.

Yes. I do step aerobics.
No lie, I was like a kid in a candy store yesterday when I picked up my machine at Modern Vac & Sew. They literally restored my machine to factory condition. The tension is perfect, the stitches are even and quite divine.... AND! It sounds like a sewing machine again! No more k'chunk k'chunk k'chunk .... it's more like a rrRRMmmmrrRRMmmmrrRRMmmmrrRRMmmm. It's a thing of beauty. If you need repairs, go see them. <--- Look, I made a recommendation!

Word to the wise, if ever decide to take your machine to the shop, I'd recommend cleaning and wiping down your machine first, before you start sewing any important project! Oils and lubrication added to the machine during the tune-up can leak a little at first, so do a couple test runs on scrap fabric, then wipe the machine down with paper towels. You'll thank yourself for doing this. Besides, you gotta treat that s*** nice, yo.

I completed three 'original design' wine bags, complete with tiny ties and brand spankin' new fabrics! Plus, I also sewed the looped handles on seven (SEVEN!) 'new design' wine bags. I think between today and tomorrow, I'm going to write up my Etsy listing for them, and hopefully take pictures of the finished products. With any luck, they'll be online for sale by the end of the week!


And of course, I did not forget the most important part. THE STAMP. I'm thinking this should be my new slogan: "If it doesn't say Nodyl's Noodles, then that shit was ripped off."

8.04.2012

diy meets life event: flowers

Let's face it folks. I live in the land of DIY where I'm the president, vice-president and CEO. When I have craft nights, it's like, all the leaders of different crafting countries coming together for the G8 summit. But we don't wear suits and we don't have awkward country-tension. I love to craft and create art. Just sayin'. That being said, I think it would be almost impossible for me to have a life-event and not do some crafty projects for it. That would be like ...I don't know... A pastry chef asking someone to bake a cake for them? You know what I mean, right?...right? This whole explanation was horrible.

FUN FACT: Did you know that I say horrible wrong? I pronounce it whore-able. Lou teases me because it's supposed to be haar-ible.

So, here's a project I'd like to tackle for the upcoming nuptials. But before that, a little disclaimer. Let me make something quite clear. This will not become a wedding blog. I'm simply not that kind of girl. Now, now, don't get me wrong. I'm stoked to the pumped about the wedding. It's going to be a ton of friggin' fun! To have an event with my family and friends all there? YEAAAAAA BOYEEEEE!

OK. Now onto a craft project I want to tackle:
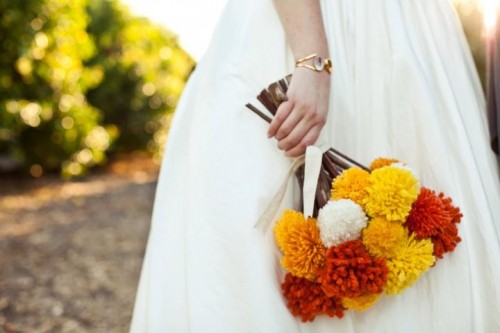
photo courtesy of Anthony Carbajal via Offbeat Bride
Handmade yarn pom-pom flower bouquets. I found this awesome article on this site called Offbeat Bride detailing how to make them. I thought this would be so super cool to have instead of live flowers. I think live flowers are so pretty, but $300.00 for a bouquet? You shittin' me, bro?


Obviously, I'll have to make one for myself, my sister, and then people who like, wear flowers. Parents and such? Maybe future husband? Who knows. I don't want them to look tacky or cheap, but I thought it would be a simple fun way to add a shit-ton of colors and fun to something that I would otherwise just pick out from a catalog. Fun pom-poms on sticks collected from the Wiss? I likes the sound of that.

Here's a little test I did with yarn that my sister gave me and sticks from out in our yard. I think they need to be bulked up a little, and the sticks need to be twigs or smaller so they can gather a little easier. I think it'd be cool! I hope family agrees.


1.21.2012

craft night!

On Wednesday, I was lucky enough to host 3 very crafty girls for an evening filled with fun, food, wine and art.  Which are some of my most favorite things, if you don't mind me sayin'!  Some lovely items were crafted, and good times were had by all.  All in all, a very successful night!

I actually did some prep-work for our art-rendezvous on Tuesday night, since my goal was to make 10 wine bags that I could put on my Etsy site. I thought it would be so much easier to iron, cut and pin all of the bags together before our gathering, since I tend to overtake the space that I'm working in. Plus, I like to sing Erasure  whilst cutting fabric, and it's slightly less embarrassing to do that alone.  It's also slightly more embarrassing to admit that.  But I did what I set out to accomplish, and by Wednesday I was ready to assemble!

6 years of paint, plaster, latex and paper.  ...done?
detail of upper right corner
During our crafting session, I sewed and completed all 10 bags which I am thrilled about!  But, that's not all.  After drinking copious amounts of wine and stuffing myself full of tiny little hot dogs and pretzels (insert omnom here), I whipped out the ol' painting I've been casually working on for the past 6 or so years.  ... I think... I'm actually done.  For the moment, here's what it looks like. I love where this painting is at right now.  My goal is to find a place in the house where I can hang it up.  I haven't had a 'hanging-worthy' painting in quite sometime.  SCORE!