5.18.2013

my first real craft show!

I had a great time at my first real craft show! I brought along 40 wine bags, 4 tie-purses, some poof ball flowers and vases that I made for the wedding, and two small paintings which you might remember: abcdef fail and anxiety.

A lot of people made me feel so great: Compliments on how clever my ideas really made me smile. It was wonderful to hear people admiring my sewing and my bags. AAAAAAAAND (drum-roll PLZ....) I SOLD 4 BAGS! I'm so glad I made more bags and spent time preparing as much as I could. I did learn a couple of things from my craft show experience.
  • I need sign. I picked up foam-core to make one the other night, and I decided that it wouldn't look professional enough, so I didn't bother making one. I need to make one like I made for Bamboula. One that says something like CRAFTS MADE FROM TIES! or CREATIONS FROM TIES! or something like that.
  • I wonder if I'm not being confident enough. I was so happy to talk to visitors at the table, that I didn't really "sell myself" like other people were. Is that a key to success?
  • It would have been nice to have someone there for a couple minutes so I could have left to use the bathroom, or to walk around to see other peoples things. At one point, I had to pee so bad that I left a note that said BE BACK IN A MINUTE! and asked the couple next to me if they wouldn't mind keeping an eye out for me. 
All in all it was a great day for a great cause. I hope I can do more fairs in the future, and maybe with some luck, I can have some more success!

5.13.2013

more F'in work

I do have some concerns about my giant F. I really needed the F to be lightweight, because the wall it's destined to hang on backs up to a shower. So I couldn't make it too heavy and risk it A: ripping off the wall with smaller screws, or B: having longer screws penetrate into the shower. Luckily, it's still light as a feather, so a couple of strategically placed small picture hanging hooks should work just fine.My other concern is having the F stay together. I tried as best as I could to execute it F'in properly. I just hope it doesn't crumble apart once it's finally up on the wall.

Last night I lightly sanded and primed the F. I'm hoping that I can get a coat of yellow paint on it some night this week. With my now part-time work schedule (eek) and part-time school schedule (EEK), I have to find a new balance when it comes to my craft-work-school time. Eek.

5.11.2013

bag n' bread

When I was putting prices on all of my wine bags, I noticed one lonely half-finished tie purse in my bin that I started last year and just never finished. I had some free procraftination time today, so now the lonely half-finished tie purse is now a non-lonely ALL FINISHED tie purse! All I had to do was finish the inside of the front panel, create the back panel, and sew them to the already finished straps. It made for a great morning of work while I was cleaning up the house. The cat is shedding, and it constantly looks like a yeti exploded in here. Gross.
 
In other Saturday news, I made Lou's Dad famous bread, and I thought I would share it since I finally got to make it this afternoon. It's a super simple recipe that requires only four ingredients. I used a spicy salt and whole wheat flour. Yum!
 3 cups flour
1-1/2 tsp salt
2-1/4 tsp yeast
1-1/2 warm water

Spray the inside of a large bowl with cooking spray. Sift all the dry ingredients into the bowl, then add the warm water. Mix until combined. Cover with plastic wrap and let it rise in a warm spot for four hours. Turn the dough onto an oiled surface and cover again for thirty minutes. While rising again, preheat your oven and dutch oven to 450°. Add dough, cover and bake for thirty minutes. Take the lid off the Dutch oven and bake for another ten minutes. Let cool on a cooling rack. Or devour immediately like I do. 

5.10.2013

F! F! F! F!

Lord knows I haven't been F'in around lately. I've been busy as F. Why the F am I talking like this? Because I have a big F'in F I'm working on. NO. SERIOUSLY. I'm making a 40" tall wall-hanging F. My sister was looking for a giant F (the first initial of her last name, not an odd ode to F) for their den, but she couldn't find something that was F'in big enough. And most were F'in expensive. So I told her I'd give an F if she'd like me to.

Onto the F'in details! First of all, I had a lot of help from an amazing tutorial over at Green Zebra Crafts. I used some different materials which I'll explain below. You know, my original idea was to use flexible wire mesh covered with paper mache. Which sounds like a horribly F'in tedious idea. Idea fail.

a giant paper F
First, I literally needed to print out a giant F. Microsoft Word didn't quite work for me, so I went into MS Paint to create my 40" tall F. Here's a F'in tip though: DO NOT make your letter in solid black. Adjust the font to a light grey tone, and print it on scrap paper so you're not wasting ink and good paper on something you're going to throw away.

two cardboard F's
Once the F was printed, taped together and trimmed of excess paper, I traced F out on enough cardboard to make two F's. Regular ol' scotch-tape worked just fine, but I think masking tape would have worked better to join all the F'in F pieces together.

Then it was onto making the two flat F's into a 3D F. Out of the F'in scraps of cardboard, I cut 1" wide strips and joined them together into a massively long 1" wide strip. I took my time and affixed this strip to the interior of the bottom F with hot glue. I used making tape to sure-up the seams on the outside. Then, it was onto attaching the top F. This I did just out of masking tape. A LOT OF MASKING TAPE.

VOILA! I had myself an F'in giant 3D F.
Crystal at Green Zebra Crafts then covered her letter with paper mache. I was on the verge of going to buy some when a 1/2 used gallon of joint compound caught my eye. F'IN BINGO. Right now I have two F'in coats of the joint compound on the front and one on the back. This weekend I'm hoping to get it completely F'in covered and textured, and paint it a glorious F'in yellow.

finished!

I can't believe how productive I've been the past couple of nights! I completely finished all 23 wine bags. ALL 23 BAGS! Each one is stamped with my little "Nodyl's Noodles" stamp, and has a cute little tag with the price. Over the weekend, I'd like to make a price sheet that I can frame for my crafter table. I have a really nice black tablecloth to use, too. I'm so excited, I really hope I can make new friends and customers next weekend!

FINALLY SOME PICTURES!
I didn't realize how cray I look in this picture.

5.09.2013

more bags, more glory (part deux)

On Monday and Tuesday I began almost obsessively working on new wine bags to (HOPEFULLY!) sell at the Arc Mercer 2012 Walk-A-Thon taking place on Saturday May 18th at Veterans Park in Hamilton Township. NJ. While I didn't get my original goals done on Monday, I sure blew through them on Tuesday night. Here's what I have in the works:

23 NEW WINE BAGS!
46 pieces of fabric cut and pressed
736 inches (or over 61 feet!) of ties cut into 16" pieces for all 23 bags
2 tie-handles sewed onto each of the bags
excess pieces of tie from handles trimmed and saved to make the tiny tie for each bag
all 23 bags ironed and ready for the final sew

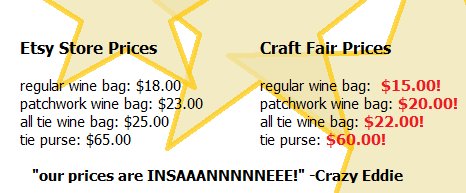
Also, I think I'm going to do special pricing from now on whenever I do a craft fair. Since Etsy charges the seller per transaction and per item post, I try to build those small costs into each bag. Since I'll be interacting with my (POTENTIAL!) customers one-on-one, I can drop the prices a little.


Anyone who grew up in the 80's and lived near New York remembers Crazy Eddie! I'm going to be the Crazy Eddie of wine bags.

5.08.2013

a little help from my friends (and major corporations)

So with the prospect of going back to school for Dental Hygiene, I ran into a little bit of what I'd call a 'mental roadblock'. While I know that I am perfectly capable and able to mentally and physically complete the program, I didn't want others (that being professors or classmates) to think that I physically wouldn't be able to because of my left hand. Nothing has ever really held me back (except ring around the rosie) and this won't either: I can sculpt, paint, type, sew, sign ASL and do most anything anyone else can do. Maybe a little better sometimes. I'm not bragging. This is just a fact. The only thing that I could foresee being a quote-unquote 'problem' was having the disposable Nitrile gloves not fit me properly. So naturally I did what any other person would do.

I started reaching out to every single Nitrile glove manufacturers and distributors I could find in the USA to see if they in any way could help me in my quest to find or make a custom fitted disposable Nitrile glove. So far, I've contacted 13 companies. Two companies emailed me back and said that they wouldn't be able to help. Which is totally fine, I'd rather have someone respond with an answer than not respond at all. One company representative called me to explain that they did not actually produce the gloves, but that she would forward my inquiry to companies that she knew of. (She also told me, good for you for following your dreams and not letting anything hold you back. TEAR!)

One company emailed me back to say "I hope that we can help you with your needs. I will consult with our team to see if there is a glove we can dip for you."

WAIT.
WHAT?
SOMEONE CAN HELP?

ER.
MAH.
GERD.

Thus begins my quest: To dig deep back into my mold making routes to make a perfect resin cast of my left hand to send to this generous company.

On Sunday, I made an alginate mold of my hand and a perfect plaster cast. From here, I will make a simple two-piece plater mold of the cast so I will be able to cast multiple hands in resin. I had forgotten how much fun it is to make a mold.. the materials, the preparation, the anticipation of cutting the alginate away to see how the cast came out. It's bliss.

Also, I need to get on my game and take some pictures. These pictureless posts are lame.

5.06.2013

more bags, more glory

It's been awhile since I've sewed some wine bags. But I have to get on my game, because 12 days from now I'll be setting up my CRAFTY BOOTH for ARC Mercer in Veteran's Park with only 18 wine bags! My goal is to make another 12-22 to bring my total to either 30 or 40.  I think I can do it between my other projects going on. I think it's time for me to realistically set goals again, folks.

OK. By the end of tonight I'd like to have all of the ties for the bags' straps cut out, all of the fabric cut out, and all of the straps pinned to the fabric. I think that's a fair goal to set for myself.

Here are the projects I have going on right now:
- Make a 40" tall wall-hanging F. (I'll explain later)
- Make a mold and resin cast of my left hand (... I'll explain later)
- Make 12-22 new wine bags to sell at craft fair
- Update and work on my collaborative blog for Moxy Murals with my fellow artist Mrs. Brown!

I'm hoping that I can create a post a day detailing some of the other projects I've been working on. There's a lot going on in Nodyl's world at the moment!

4.26.2013

many things, many things.

Many things. What has been going on in my life over the past couple months? MANY THINGS. And all are such good things. I've gotten married. I've been on a lovely honeymoon with my future husband. I've been accepted to go back to school to study Dental Hygiene. Spring has sprung. Life is good. But while much of life happened, I put a temporary hold on my art projects. Much of that will be changing as I dive deeper into this new chapter of my life.

But for now, check out what I'll be up to on May 18th!!
I will be selling and displaying my wine bags and tie purses at the 2013 Arc Mercer Walk-a-Thon, located at Veterans Park in Hamilton Twp. NJ!!! Arc Mercer is a non-profit organization that provides a range of quality services for individuals with developmental disabilities. You can support Arc Mercer by participating in the Walk-a-Thon: Call Ms. Kelly Jiras at 609-406-0181 ext. 146

I hope to see you there, if not, just check back later for fun pictures of the event on my blog!

2.27.2013

culmination

It seriously took me a couple days to put my thoughts together to write this post. You could say this post entitled culmination is the culmination of thoughts, but it's mostly about the culmination of one of my most difficult projects. Actually, it's all about the culmination of my most difficult project. I never thought I could use that word 4 TIMES in the same post!

I FINISHED THE QUILT.
That's right... The quilt is finished! Der Quilt ist fertig! El quilt está terminado!

As you might recall, in my last quilt post I noted that I needed to hand stitch the open seam closed to the backing fabric and officially 'sign' the quilt. I began by pinning the binding in place with my super long 1-1/2" flat quilting pins. Then, since I'm not a very good hand-stitcher, I thought it would be wise to do some research on which stitch would be best to finish the open seam. (PS: Typing which stitch would be best is just as hard as saying it three times fast.) I ended up choosing the blind stitch thanks to the awesome instructions and description on this blog called Quilting in the Rain. <--- If you have a couple of minutes, please check out her blog: It's unbelievable, plus it's so bright and cheery!

It look me a little while to find my stride when it came to blind stitching, but over the course of a week, I diligently sewed the night away. I pricked my fingers.. and legs... and arms a couple of times, thanks to those super long 1-1/2" quilting pins. But with every stitch, I knew that I was getting closer and closer to finishing my first quilt.

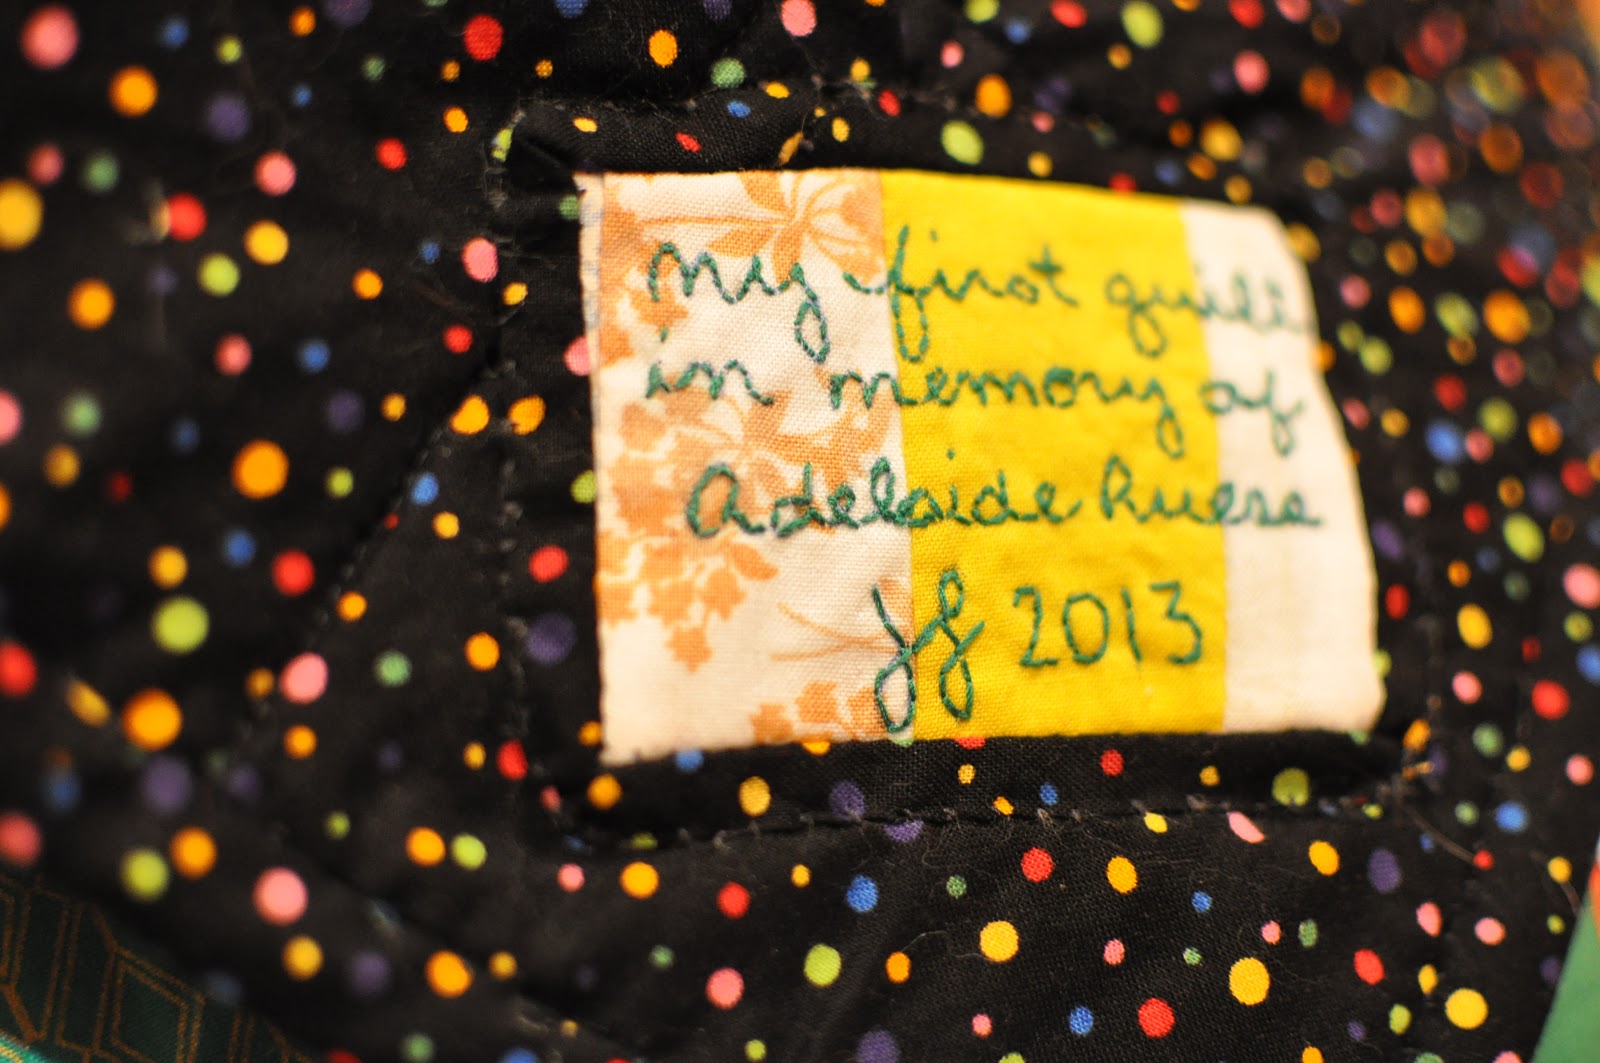
On Saturday night, I sat down on the couch and began stitching away, knowing that within a couple of hours my project would be finished. I thought about all the work that went into making it. I thought each strip of fabric that I pieced together, sewing them onto the muslin blocks, pressing them flat and fashioning them all into rows and columns. I thought about how I almost convinced myself to send it out to get finished, and the moment it dawned on me to just give it my best shot. I thought about all of my family, and the signatures that they added to different blocks of fabric. And then I thought about the one signature that was missing. Adelaide Ruess. 

So, I added it myself. 
I was emotionally and physically exhausted after finishing it, and ended up falling asleep on the couch wrapped up in my new quilt. I was so happy that I accomplished my goal of making a quilt, but I was also quite sad. It's cruel to me that I can't show it to Audi. But in my heart, somehow I think that she has seen it. I hope she's as proud of me as I am of myself.

If you'd like to look back at all of the quilt related posts, you can find them right here.

2.19.2013

obligatory wedding craft DIY post part 2

So on to the place cards. I accidentally purchased ones that are more like business cards, and less like the tenty-ones that I thought I was buying. My bad. I wasn't going to return them back to Vistaprint, so I had to find a solution to my little problem.

 
So I did what anyone else would have done: I Google'd it! I typed in place card holder and the one solution that caught my eye was a holder made from a wine bottle cork. Can you believe though, that some people on Etsy are selling them for upwards of $1.00 each? You and I both know that's a whole bunch of bologna. I can do that for way, way less. Actually... maybe I can ask Lou to do it for me since he's handy with tools and loves spending time in the garage...

BINGO.

I found some pretty cool online tutorials, but I thought I'd share my own below.

Wine Cork Place Card Holders
1. Buy 100 bottles of wine (remember, you'll need one bottle per guest!)
2. Open and drink 100 bottles of wine. Save the corks if you're not too drunk to remember this step. Keep drinking until you have enough corks!
3. Take 4 weeks to sober up, and/or be released from the hospital.

Or you can...
1. Go on EBay and purchase a bulk bag of 100 corks for $10.00.

I wouldn't recommend the first set of instructions unless you want to spend a lot of money or become a raging alcoholic.


Now, take your corks one at a time, and set them up in a vice-grip if you have one. It is much easier than trying to hold all the corks while trying to cut them. Cut off the bottom 1/3 of the cork and discard. Run a piece of medium grit sand paper over the cut surface. Finally, make a slit in the top of the cork deep enough for you to insert your place card.

VOILA! YUR DUN. And all for $10! With that extra $90, you can go buy many cases of vino from Total Wine!


2.18.2013

obligatory wedding craft DIY post, part 1

Yes, I know I said that this wasn't going to become a wedding blog, and I promise that it still won't. I'm not going to get all omg look at these wedding favors (ERMAHGERD LERK ERT THERS WERDIN FERVERS!!) up in here. But there have been so many crafts that we're doing for WDay, that it would be impossible to ignore all the fun we've been having. We're literally crafting our poof balls off.

You may remember a while back I was making a ton of yarn poof-ball flowers in anticipation of using them for as my wedding flower boquet. Well... the idea was ultimately vetoed, so I decided to just use them as decoration instead. Luckily, back in November whilst on a Pocono hike, I found A TON of discarded bottles in the woods. There must have been hundreds of them. So, like any good  hoarder environmental enthusiast, I loaded up those gross, mud caked bottles into the car and carted them home. After giving them a good soaking and shining them up with Windex, they looked like brand new. AAAAAAAAAAND I had the perfect vessels for my poof flowers! Some bottles still had gook and goobers inside, so I cleverly wrapped twine around those sections, disguising the grossness.

That was my Saturday project. I had to make a couple more poof flowers, so it took me a little while to get all 15 of the bottles done.

On Sunday, I made the 'guest book'. And by 'guest book' I mean, matted picture frame. When it comes to guest books, there's about a zero percent chance that I'll ever sit down to peruse a guest book. We framed up an 8x10 picture that we took in front of the Golden Gate Bridge with a 16x20 mat. I used some old Scrabble letters, some wire and decorative beads to label it as the 'guest book'. Not too bad for a couple hours of crafty work! Tomorrow I'll post about the place card dilemma and solution.

2.08.2013

ERM ERLMAHST FERNERSHERD MAH QERLT

Translation: I'm almost finished my quilt! Side note here: Since my purchase of my ERMAGERD! embroidery from Etsy, I've been kinda obsessed with TERLKIN LERK THERS. I literally can't help it since it's one of the only things keeping me in the sane department. FERGERV MAH.

SO! I've been one busy beaver the past couple of weeks... that sounded odd, but I'm going to keep it in the blog anyways because I can't think of anything better to say. Here's some good news. I finished quilting the rows and columns of my quilt! As you might remember I was in the midst of machine quilting about three weeks ago. Luckily, I finished and it went as well as I expected it to. Holla!

My next set of instructions kinda baffled me. I had to cut a 36" square of the backer fabric, cut it in a diagonal, restitch it together, press it flat, measure bands 2.5" wide, match up the lines of the bands, sew the piece into a tube, then cut one continuous band out of the fabric. WHERT DA FERCK you say? Yes, indeed. It took me a long time to be confident enough in myself to even attempt it. But, I took my time, and when I was I finished, I had a 2.5" band of fabric that was about 354" long. You read that right. Three hundred and fifty-four inches long. THRER HERNDRERD ERND FERFTERFER ERNCHERS LERNG.

From there, I pressed the band lengthwise (wrong sides together) and wrapped it neatly around a roll of duct tape... just so it wouldn't get all un-pressed and funky. Yesterday, I grew a set and said "You know what?! I'm going to attach the binding tonight!!" WHY NOT?! It's not like I have anything else going on! SARCASM TO THE EXTREME.

So. I went for it. And by 11:30pm, I had the band of binding machine stitched around the entire perimeter of the quilt. I cut off the excess fabric and pressed the seams open. The only thing left for me to do is hand stitch the open seam closed to the backing fabric, and to attach a piece of fabric with my signature on it. Ah bliss. I can't believe it's almost done!


1.17.2013

blanket is fo'evs

Not many friends of mine still have their baby blanket. Yes, you could consider me some sort of odd-ball because YES, I still have mine. It's name is Blanket. I sleep with it every night. Maybe I shouldn't be making these statements over the internets.

Anywho, I went to the fabric store last Friday because my dear Blanket was in desperate need of help. I've washed it so many times over the past... oh... 29 years, that the fabric was literally shredding apart. Mind you, that Blanket has been recovered twice already. So the original blanket was enclosed in a blanket, which was within the outermost blanket. I picked a yard of yellow and a yard of white, paid for my purchase, and went home to work on Blanket. I didn't finish it in one night though. Which meant that:

I WAS WITHOUT MY BLANKET FOR ONE NIGHT.
THE HORROR.

The next day, I woke up depressed because of my non-Blanket night, but I was determined to finish it. I completed the blanket's envelope the night before, and all I had left to do was pin the blanket to the interior of the envelope, stitch it in place, and of course... add the signature "Jill's Blanket" to the corner. It let's everyone know to BACK OFF, because it's MY BLANKET.

I didn't choose the blanket life. The blanket life chose me.
It has been with me from my earliest, most surly days. See how upset I was? Why was everyone smiling? Clearly I was sad that I couldn't eat turkey yet. It was also with me the day I tried to eat my shoe. It traveled with me to my Audi's house. Lady dog loved my blanket. It was with me every Christmas: From the year that I got thee Domino Rally, to the one where I had brace-face and got my froggy slippers from Santa. It even traveled with me to Florida on our Griswold family vacation. So what if I was in my second year of college?

I may be a softy because I sleep with my Blanket, but I love it and see no reason why I should give it up. There are very few mementos that we hold onto while we transition from childhood into adulthood, other than pictures and Polaroids that we can look back on in our later years. But every time I curl up with my Blanket, it instantly transports me to every single night I've fallen asleep with it. There's not many things in life that can do that.
ERMAHGERD! BLAAAANKERRRRRT!


1.16.2013

UPDATE.

8:15pm I wrote a blog post tonight that I'll post tomorrow, due to scanning pictures.. that I'll need to do at work. The post is done, but it's nothing without the pictures. NOTHING I SAY! But I am most certainly smiley now thanks to a fine bottle of Merlot, and I'm considering buying massive quantities of schtuff on Etsy. I'm looking for a cross stitch. More specifically, a hilarious cross stitch. Unfortunately, I roamed over into the realm of tapestries, and I found a couple of 'beauts. I found a kitty playing with string. There are numerous ones of Jesus in different prayer positions. DEAR LORD, there are also many... MANY entitled 50 shades of passion. I have to navigate myself out of here ASAP!

8:22pm Uh oh. I just found something. OH GOD. I think I'm going to buy it. Did I mention I found a CD that I made in college entitled Best CD Eva? It's a mix of the Spice Girls, Aerosmith, and Avril Lavigne. Don't be jealous of my mix CD.

8: 26pm UPDATE. I bought it. Don't be jealous.

YO I'll tell you what I want, what I really, really want.
So tell me what you want, what you really, really want.
I'll tell you what I want, what I really, really want.
So I'll tell you what I want, what I really, really want.
I want a, I want a, I want a, I want a, I wanna really, really, really want is ERMAHGERD.


1.15.2013

week overdue

Yes, I was supposed to write a post last weekend to update all of the crazy fun stuff that I've been doing, but my time ran short on every single day. How does that always seem to happen? I'm not that popular, so that's not it. I am planning a wedding though. I'll blame it on that. Things are going well, quite well if you ask me. You didn't ask me though, but I'm telling you that anyways.

After about a month or two of consideration, I've decided not to send out my quilt for finishing. To meet the criteria of having it finished off by a long-arm quilter, it would have had to be damn near perfect. And it wasn't damn near perfect. It never will be damn near perfect, because it's my first quilt and quite frankly, I don't want it to be damn near perfect. There were ripples. It didn't lie completely flat. And if there were any rogue strings or threads exposed during the quilting process, it could have torn the quilt and destroyed everything I worked so hard on.

So. I sucked it up. I picked up that quilt on Sunday and started quilting the columns again. And GAADAMN it wasn't easy. Imaging running a full-sized quilt through a sewing machine. It looked a lot like this:

AHHHHHHHH QUILT EXPLOSION!
But, like I said: I sucked it up! I kept the quilt as taught as I could, constantly changed the needles and kept the bobbin completely stocked with thread. After what seemed like hours, I had all of the columns completely finished. MAJOR SCORE. After almost a year of not working on it, I was happy to see it and feel it again. Yesterday, I started working on the rows, which will be a lot tougher than the columns. You see the columns are all perfectly straight. But the rows.... ehh... not so much. Again, I'll rely on MSPaint to express myself.

 
When I go to stitch a row, they don't line up completely. So as soon as I get to an area where the row doesn't line up, I have to turn the quilt, stitch along the column for literally less that centimeter, then turn the quilt again to continue sewing the row. I set myself a goal of completing two rows per day, and it should take me about 7 days total, unless I double up a little over the weekend.

HERE'S TO GETTING SHIT DONE.

1.04.2013

eek.

OK. Yet another month has gone by and I still haven't posted. Even though I've done some crafty-crafts and such. I'll update this weekend. OK... Monday. Wednesday at the latest.

In the meantime, here are two delightful images of a snake we found this summer that was barfing a frog. Enjoy!


12.05.2012

help!

As you may remember (I certainly do) I started working on my quilt back in September of 2011.
Wait... September 2011? 14 months ago?!


Ah, remember all those fun pictures? I had such a great time sewing a row of bright colorful fabric, pressing them off in between each new addition and sewing all the blocks together. Anywho... every time I walk into my studio space, I see my unfinished quilt and it makes me sad. I want to pick it up and finish it, but I feel like I'm at an in-pass. I have the quilt top. It's not perfect, but it's my first one and I'm proud of it. I have the batting and the backer fabric. I basted them all together. I even quilted a row... but I don't think I did it very well.
 
I've been thinking a lot about it lately, and I believe it might finally be time for me to ask for help. Something I don't do very well, but to complete this project successfully, I think it would be a great idea to send my quilt to someone who knows what they are doing. And doing so will probably require a lot of prep-work on my end. I need to remove all the basting, as well as the row that I quilted. I need to make sure that the backing fabric and the basting are exactly 3" longer on each side. And they need to be square. So does my quilt top, for that matter. I don't want my quilt to cause whomever is helping me headaches and irritation.

So I'm waiting to hear back from someone if they will accept my quilt as a project. I hope they will have as much fun with it as I did!

12.04.2012

midnight surprise

Last night, after a grueling workout at the YMCA and a successful outdoors Christmas decorating session, I reclined on the couch and debated my options for the evening. I could either:

1. Fall asleep on the couch while watching Monday Night Football, be super cranky when Lou wakes me up to come to bed, stumble upstairs and probably forget to brush my teeth, lay awake in said bed because of course, I wouldn't be able to get back to sleep.

2. Go upstairs, take care of business (bunny visits, personal hygiene, put laundry away, all those fun things) go to bed and read a book. Fall asleep in bed and not wake up grumpy or cranky.

I tried to be adult-ish, and I went with option number 2. But about 20 minutes after I jumped into bed, I heard my phone brrrrrrnnng-a-lllllnngggggg from downstairs. DRAT. I forgot to turn down the phone volume. Again, I considered my options:

1. Ignore that I left the phone's volume on super high. Risk being woken up at 6am from the alarm on the phone that I forget to disable all the time. Also risk being woken up from any phone notification that may go off during the night.  DING-A-LING B**** YOU GOT MAIL! WAKE UP!

2. Get up and go downstairs. Check to see that the alarm isn't set. Turn phone to silent.

Since I was technically on a roll from my previous adult-ish decision, I went with option number 2. I checked my phone and saw that I had received a Google Talk message and two emails. Lou had messaged me "dork" about an hour earlier. Thanks buddy. But the emails were to my art account. One was entitled Etsy Order Confirmation and the other was Notification of Payment Received.

I stood there, blocking the television, staring at my phone. "OH MYYYYY GOD, Lou. I sold a purse on Etsy! I have a sale!" My heart swelled. A sale! Mind you, it was midnight by this point. I went from sleepy to wide-f***ing-awake really fast. After doing a tiny dance, I ran upstairs to my office and removed the purse from my bin of finished items... and meticulously went over it, making sure that all the stitches were proper, that there were no snags, no blemishes. Then I got really nervous. What if it's not good enough? What if she doesn't like it? I hope she does. But that is for time to tell. I packaged it up nicely with tissue paper, inserted a thank you note, taped up the box and said goodbye to it.
 
So, dear purchaser, if you are out there. Thank you. Not only for your purchase, but for restoring a little bit of my confidence. Thank you so much. 

11.02.2012

time to step up.

Hurricanes. They're no joke. Period.

I know a lot of people were poking fun at those who went to the store to stock up on basic provisions like food, water and batteries to prepare for the storm. I sat by those conversations, but tuned them out and refused to contribute in any way. You know why? Because the people who prepared for the worst, but hoped for the best were smart. Sure, forecasters can hype up storms, and media coverage is completely redonk: They can cause a sense of panic, which is an unnecessary douchey-move. But to think that some of those people, the ones who did prepare, are still in the dark while their supplies quickly dwindle... how funny is that now, huh? It's not, and it never was.

I consider myself to be insanely lucky that no harm came to myself, my boyfriend future husband, or our home. We didn't even loose power, which is remarkable when thinking back to how the wind was howling, bending trees at odd angles and sending the rain down the road in cascading sheets. My family is unharmed. Some still without electricity, heat or running water. There were some lost trees and some scattered damages. But all are alive and healthy. What more could I ask for? Not too damn much.

You begin to think of everything that you take for granted on a daily basis, and it's overwhelming to think about how lucky you really are. Going to the grocery store. Filling up your gas tank. Making a cup of coffee. Sometimes I think I should not be this fortunate, and guilt slowly begins to bear down on my shoulders. Why did I come out unscathed, while my sister, who is nine months pregnant, has a cold, dark house without running water? How is that f***ing fair, I ask? It's not. Life isn't fair.

My sense guilt has turned into determination to help. We can all help. Disasters happen in this country and in this world every day. You can make donations to the American Red Cross Disaster Relief Program by calling 1-800-RED CROSS or by texting REDCROSS to 90999. You can lend a hand to your neighbors. Do you have an extra blanket, jacket or gloves to give to someone who doesn't have heat? How about inviting them over for a hot meal and a chance to warm up? Are you going to the store? You can buy an extra gallon of water, some toothpaste or some canned goods for your community relief shelter. Do you know anyone who was evacuated? How about asking them if they'd like to stay at your house, even if it's just for a night or two? In short, anything can help. Kindness and consideration for others, no matter how small, might mean the world to someone who is in need. 

Homes? They can be repaired. Material possessions? They can be replaced. But saying those things cannot and will not fix the pain that so many thousands, dare I say, millions of people are bearing, and will bear in the weeks and months to come. Especially not to those who have lost everything, including loved ones. They need us.