Showing posts with label quilt. Show all posts

5.23.2016

in my spare time, I made a f***ing quilt.

I have NO IDEA how I did not post ANYTHING about this over the past couple of months. I literally started this quilt... almost a year ago I think? AND NO. NOT ONE POST.

Not a look I bought fabric! post.
Not a I washed, pressed and cut all these squares! post.
some sample colors that I wove together for your viewing pleasure.
Not a look how many squares I made or look now the squares are sewed into blocks! post.

NOPE! NOTHING! So I'll have to summarize my misadventures in my 2nd, yes 2nd! quilt.

Back last May, after I took my board exams, passed! and was waiting (im)patiently for my license to practice, I decided to go to Jo-Ann's because damnit, I had a coupon. I bought 20 fat-quarters of fabric, a couple yards of white fabric with tiny little birdies on it, and an Omnigrid 8.5" square template. I didn't know what type of quilt I was going to make, but damnit, I was going to make another quilt.
Seriously, nothing against my first quilt, but it's not exactly big enough for our bed. I'm afraid one night we're going to rip it in half because we always seem to be yanking it to cover our feets.  Here's where it gets confusing. 

Each fat quarter gave me 4, 8.5" squares of colorful fabric.I now have 80 colorful squares. I then cut another 80 squares from the white fabric. Every colorful square was sewed to a white square, then cut down into 8 triangles. You can see below how I drew, on each white square: Diagonally with a 1/4" allowance, then in half. This made a total of 640 squares. Unfortunately, I needed to sew an additional 10 squares from scrap fabric, but I found this out early, allowing me to incorporate them seamlessly into my quilt!  SEAMLESSLY. GET IT?

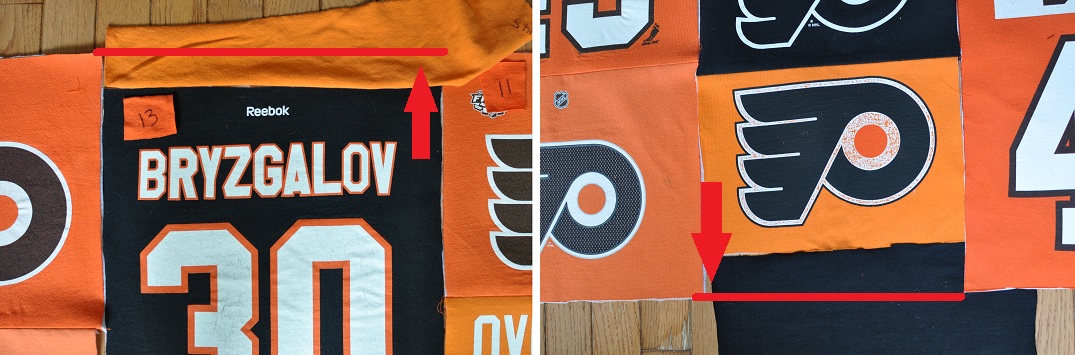
Every triangle was then pressed open into a square. Then came the hard part: Trying to decide how I was going to assemble all of the now 650 squares. So I'll leave you with some pictures... the first set is just showing how I actually assembled the blocks, and the last photo is of all the colorful blocks! There were so many patterns to choose from, but that'll have to wait for yet another post...


9.22.2015

a new... something

Heads up: I've had wine! 

After I finished up the t-shirt quilts, I decided that it was finally time to focus in on one for myself. I found this AMAZING but complicated pattern in a quilting magazine that I purchased (YES, I buy quilting magazines. Thug life.) but there was a problem: It was a pattern for a twin quilt. I don't need no stinkin twin quilt. Another problem: I already had way too many scraps left over from my first quilt, I thought it'd be a waste not to use them... but how?

So... I just started sewing. I took out my box of scraps and basically just started machine stitching them together. Since all of the scraps were tapered, they started looking like colorful fans. I had another interesting thought. What if I sewed these fans into a wave? Then what if the wave became a column? And what if I sewed these columns together to form a sort-of-painting

 So many questions! One final product,  though.Once I finished sewing the columns together, I quilted it with gold thread. Then stapled the s*** outta it onto a canvas. Soon I'm going to frame it. SOON... SOON.


9.09.2015

t-shirt quilts, part DUEX

From where we last left off, I had finished stitching together all of the t-shirts into two lovely quilt tops. I hate to say but I barely documented part DUEX in pictures. I was sew busy. Heh. … ok, lame joke.
SO! Choosing a batting… You want to be sure that you find one that matches the project that you’re working on. A flatter, less puffy batting is great for quilts that you want to be… well, flat and less puffy. Especially ones with intricate designs. I chose a really nice medium puff batting, because of two reasons. 1) The t-shirts and backing material had a little stretch to them. The puffiness of the batting would help this irregularity when I stitched it together. 2) WHO DOESN’T LIKE PUFFY QUILTS? You? Well, you're un-American.
PUFFY!
Luckily, the backing fabrics that I chose for both quilts were W-I-D-E as H-E-L-L. So I didn’t need to stitch two pieces of the backing together. To cut the backing and the batting to size, here is the easiest thing to do: Find a floor. Put the backing fabric on the floor, and secure it with masking tape so it stays put. Next, lay the batting on top, followed by the quilt top. Secure all that shiz together with long quilting pins or safety pins. (I use quilting pins... I have no tolerance for safety pins, plus they're too bulky.) Lastly, cut the backing and batting about 6” bigger than the quilt top. This gives you a safe zone in case you f*** up.

Here’s the tricky and painful part. You will now stick yourself with so many pins. SO. MANY. And not just on your hands. The quilt literally lays on your lap while you’re trying to machine stitch it. It’s like trying to lay down with a needle filled blanket. Very ouchI start by machine stitching the long columns of the quilt. Then, stitch the rows. Since the rows are irregular, I usually will pick up the needle and foot, move to the beginning of the next row, and sew on. 

turns out, it's a real thing.
Next comes the binding… Binding is tricky, but once you get the hang of it, it’s… just less tricky I guess. I cut a continuous piece of fabric 2.25” wide, press it in half, then sew the raw edges to the edge of the quilt top. You then cut off any excess batting and backing fabric…. Then you have to hand stitch everything shut. It takes a LONG TIME. And your hands will not thank you. But it’s worth it, especially with wine that you CANNOT SPILL ON THE QUILT. If you're a spiller, then put your wine in one of those toddler sippy cups.

To add a personal touch, I asked my friend to send me (in her writing) a message for each of the quilts. I printed it out, then used graphite paper to transfer her message to white fabric. I then hand stitched her message and sewed this on to each quilt. So that’s it! Two quilts finished. I hope they surround their new owners in years of love and comfort. It was such a cool project, I’d be totally willing to do more of them in the future!!! 
 

7.18.2015

t-shirt quilts, part 1

A friend of mine asked me to make two t-shirt quilts for her sons. One is in a Phillies motif, the other is Flyers. Quilts are fun to do, but they can be difficult if you don't choose the right materials. T-shirts: You cannot just sew them together. You have to use fusible interfacing to stabilize the stretchiness... if you don't, you'll end up with a bunch of stretched out-crazy looking t-shirts that you'll want to burn instead of cuddling up with.

The first thing you need to do with t-shirts is cut out the BS. So, that means cutting out the front of the shirt and the back, and tossing away the sleeves and seams. Then you have to measure the width of the actual design on the t-shirt... This will help you organize the shirts into columns. For the two quilts that I'm doing, each one has column widths of 11", 12", 13" and 14". Once you organize everything into columns, you have to determine what length each shirt will be... then you're ready to cut everything out. Straight edges are keeeeeeeeeey in this step! If you don't have a perfect right angle, your quilt will be wonky. Keep some of the excess shirt scraps... you might need some later on.

Once everything is cut out, set yourself up in front of the TV and pour yourself a glass (or two) of wine, because it's time to iron on the fusible interfacing. Like I said, it'll keep the fabric stabilized when you sew everything together! Then the fun begins... arrange allllll yo' shirts in their columns, and start sewing errrything together! Be sure to always press the seams open with a hot iron, this will ensure that the quilt lays flat n' lovely.
Remember some of those scraps you saved? If your quilt is too short in some areas, cut out scraps in that size and fuse the interfacing to it: Then stitch to the quilt so it's the correct length!
NEXT UP! Cutting out the backing fabric, choosing a batting and assembling everything together.

2.27.2013

culmination

It seriously took me a couple days to put my thoughts together to write this post. You could say this post entitled culmination is the culmination of thoughts, but it's mostly about the culmination of one of my most difficult projects. Actually, it's all about the culmination of my most difficult project. I never thought I could use that word 4 TIMES in the same post!

I FINISHED THE QUILT.
That's right... The quilt is finished! Der Quilt ist fertig! El quilt está terminado!

As you might recall, in my last quilt post I noted that I needed to hand stitch the open seam closed to the backing fabric and officially 'sign' the quilt. I began by pinning the binding in place with my super long 1-1/2" flat quilting pins. Then, since I'm not a very good hand-stitcher, I thought it would be wise to do some research on which stitch would be best to finish the open seam. (PS: Typing which stitch would be best is just as hard as saying it three times fast.) I ended up choosing the blind stitch thanks to the awesome instructions and description on this blog called Quilting in the Rain. <--- If you have a couple of minutes, please check out her blog: It's unbelievable, plus it's so bright and cheery!

It look me a little while to find my stride when it came to blind stitching, but over the course of a week, I diligently sewed the night away. I pricked my fingers.. and legs... and arms a couple of times, thanks to those super long 1-1/2" quilting pins. But with every stitch, I knew that I was getting closer and closer to finishing my first quilt.

On Saturday night, I sat down on the couch and began stitching away, knowing that within a couple of hours my project would be finished. I thought about all the work that went into making it. I thought each strip of fabric that I pieced together, sewing them onto the muslin blocks, pressing them flat and fashioning them all into rows and columns. I thought about how I almost convinced myself to send it out to get finished, and the moment it dawned on me to just give it my best shot. I thought about all of my family, and the signatures that they added to different blocks of fabric. And then I thought about the one signature that was missing. Adelaide Ruess. 

So, I added it myself. 
I was emotionally and physically exhausted after finishing it, and ended up falling asleep on the couch wrapped up in my new quilt. I was so happy that I accomplished my goal of making a quilt, but I was also quite sad. It's cruel to me that I can't show it to Audi. But in my heart, somehow I think that she has seen it. I hope she's as proud of me as I am of myself.

If you'd like to look back at all of the quilt related posts, you can find them right here.

2.08.2013

ERM ERLMAHST FERNERSHERD MAH QERLT

Translation: I'm almost finished my quilt! Side note here: Since my purchase of my ERMAGERD! embroidery from Etsy, I've been kinda obsessed with TERLKIN LERK THERS. I literally can't help it since it's one of the only things keeping me in the sane department. FERGERV MAH.

SO! I've been one busy beaver the past couple of weeks... that sounded odd, but I'm going to keep it in the blog anyways because I can't think of anything better to say. Here's some good news. I finished quilting the rows and columns of my quilt! As you might remember I was in the midst of machine quilting about three weeks ago. Luckily, I finished and it went as well as I expected it to. Holla!

My next set of instructions kinda baffled me. I had to cut a 36" square of the backer fabric, cut it in a diagonal, restitch it together, press it flat, measure bands 2.5" wide, match up the lines of the bands, sew the piece into a tube, then cut one continuous band out of the fabric. WHERT DA FERCK you say? Yes, indeed. It took me a long time to be confident enough in myself to even attempt it. But, I took my time, and when I was I finished, I had a 2.5" band of fabric that was about 354" long. You read that right. Three hundred and fifty-four inches long. THRER HERNDRERD ERND FERFTERFER ERNCHERS LERNG.

From there, I pressed the band lengthwise (wrong sides together) and wrapped it neatly around a roll of duct tape... just so it wouldn't get all un-pressed and funky. Yesterday, I grew a set and said "You know what?! I'm going to attach the binding tonight!!" WHY NOT?! It's not like I have anything else going on! SARCASM TO THE EXTREME.

So. I went for it. And by 11:30pm, I had the band of binding machine stitched around the entire perimeter of the quilt. I cut off the excess fabric and pressed the seams open. The only thing left for me to do is hand stitch the open seam closed to the backing fabric, and to attach a piece of fabric with my signature on it. Ah bliss. I can't believe it's almost done!


1.15.2013

week overdue

Yes, I was supposed to write a post last weekend to update all of the crazy fun stuff that I've been doing, but my time ran short on every single day. How does that always seem to happen? I'm not that popular, so that's not it. I am planning a wedding though. I'll blame it on that. Things are going well, quite well if you ask me. You didn't ask me though, but I'm telling you that anyways.

After about a month or two of consideration, I've decided not to send out my quilt for finishing. To meet the criteria of having it finished off by a long-arm quilter, it would have had to be damn near perfect. And it wasn't damn near perfect. It never will be damn near perfect, because it's my first quilt and quite frankly, I don't want it to be damn near perfect. There were ripples. It didn't lie completely flat. And if there were any rogue strings or threads exposed during the quilting process, it could have torn the quilt and destroyed everything I worked so hard on.

So. I sucked it up. I picked up that quilt on Sunday and started quilting the columns again. And GAADAMN it wasn't easy. Imaging running a full-sized quilt through a sewing machine. It looked a lot like this:

AHHHHHHHH QUILT EXPLOSION!
But, like I said: I sucked it up! I kept the quilt as taught as I could, constantly changed the needles and kept the bobbin completely stocked with thread. After what seemed like hours, I had all of the columns completely finished. MAJOR SCORE. After almost a year of not working on it, I was happy to see it and feel it again. Yesterday, I started working on the rows, which will be a lot tougher than the columns. You see the columns are all perfectly straight. But the rows.... ehh... not so much. Again, I'll rely on MSPaint to express myself.

 
When I go to stitch a row, they don't line up completely. So as soon as I get to an area where the row doesn't line up, I have to turn the quilt, stitch along the column for literally less that centimeter, then turn the quilt again to continue sewing the row. I set myself a goal of completing two rows per day, and it should take me about 7 days total, unless I double up a little over the weekend.

HERE'S TO GETTING SHIT DONE.

12.05.2012

help!

As you may remember (I certainly do) I started working on my quilt back in September of 2011.
Wait... September 2011? 14 months ago?!


Ah, remember all those fun pictures? I had such a great time sewing a row of bright colorful fabric, pressing them off in between each new addition and sewing all the blocks together. Anywho... every time I walk into my studio space, I see my unfinished quilt and it makes me sad. I want to pick it up and finish it, but I feel like I'm at an in-pass. I have the quilt top. It's not perfect, but it's my first one and I'm proud of it. I have the batting and the backer fabric. I basted them all together. I even quilted a row... but I don't think I did it very well.
 
I've been thinking a lot about it lately, and I believe it might finally be time for me to ask for help. Something I don't do very well, but to complete this project successfully, I think it would be a great idea to send my quilt to someone who knows what they are doing. And doing so will probably require a lot of prep-work on my end. I need to remove all the basting, as well as the row that I quilted. I need to make sure that the backing fabric and the basting are exactly 3" longer on each side. And they need to be square. So does my quilt top, for that matter. I don't want my quilt to cause whomever is helping me headaches and irritation.

So I'm waiting to hear back from someone if they will accept my quilt as a project. I hope they will have as much fun with it as I did!

3.27.2012

don't like.

Yesterday I decided that I would finally do it. I gathered my supplies: the quilt, thread, needles, and a big ol' hoop, sat down on the couch and started to quilt the quilt.

Truth be told... here comes the complaining in 3...2...1...
I don't like hand quilting.
I don't like it one bit.
I poked myself with the needle, and the needle went in FAR. I almost bled out. not really...
And I only hand quilted about six inches.
I have 7,225 total inches to quilt.
I quickly became discouraged and turned on Intervention to make myself feel better.

So. What to do now?
Turns out that my sewing machine gets through all three layers quite nicely. And fast. Without all the pokes. My machine quilted 170 inches of quilt in the time it took me to do six by hand.

IN THE BATTLE OF HAND VERSUS MACHINE....

MACHINE WINS.

3.16.2012

the balancer

Spring is a finicky season: You get luxurious bright and sunny days, mixed in with sporadic rainy dreary days. I think it's kinda funny when people complain about the rain. Is it really all that terrible? Sure, you can't do everything you wanted to outside... but what about all the things that you can be doing inside, besides complaining? And if it didn't rain, well... s***, we'd all be a little parched, wouldn't we?

When I look the big picture, the weather seems like a natural balancer for me. When it's sunny and beautiful outside, I spend all my time out in the garden. Or thinking about being outside. Or, ironically, watching HGTV shows about being in a garden. Which doesn't make any sense, because I'm inside the house watching a show about being outside the house. Any hopes of working on bags, sculptures or the quilt flies right out the window. My mind is filled with transforming the outdoors.

But on days like today where it's overcast, drizzly, dark and stormy, the reset button in my mind is clicked and I think about all the things that I can do inside. I want to race home from work, jump into comfy pants, and start on projects that will keep the wheels in my mind spinning like... well, wheels. There are three more wine bags I have cut out that need to be sewn together. There's a basted quilt that's begging to be sewn together. And there's tree bark that's sitting, waiting to be transformed into a sculpture.

Is there a point to all this? Eh, not entirely. I'm just excited to get home and get to work. If I have to depart with a point, it'd be to make the best out of every situation. I can't wait to take pictures of my weekend projects! Here's to the rain!

3.06.2012

the master baster

I've been moving along, slowly but surely, on all of my projects despite my little setback over the weekend. One thing I was determined to do this past weekend was to baste my quilt. What is basting you my ask?
No, not this. Although that looks DELICIOUS.
Basting is basically securing all the layers of your quilting creation together, so that they don't slip, pucker or distort while you're quilting. My quilt is made up of three layers: The top is the colorful crazy creation I've been making and detailing on my blog. The middle is a low loft natural cotton batting that will add warmth and girth to the quilt. And finally, the backing fabric: This colorful cotton dot-print that I found at Jo-Ann Fabrics.

First I had to find a big enough floor space to work on. Basting a full size quilt required a good amount of space, so I settled in front of the television. SCORE. Next, I spread out the backing fabric (wrong side up!) being careful to smooth lumps and bumps along the way. I unwrapped the batting I bought back in October and realized it needed to be ironed. No problem! I poured some ice tea, tuned into some HGTV show about knocking down walls and set to work. Once the batting was smoothed, I layered it on top of the backing. Finally, I smoothed out the top layer over the batting.

Now for the fun part. 

There are many ways you can baste the layers together, including hand stitching and safety-pinning. But, I found a badass basting GUN.  Can you believe it?! A BASTING GUN! You insert a needle through all three layers, pull the trigger and BAM! A little plastic thing binds the layers together. I worked from the center of one side ALLLLLLLLLLLLL the way down to the other side and got it done in about an hour. Not bad!

2.13.2012

sew all.

On Saturday morning, I made a list of things I had hoped to accomplish over the weekend. As you can see, I crossed off only one item from the list. I didn't just sew more, though.
I SEWED ALL.
After a marathon sewing session, the entire quilt top is now sewed, pressed and complete! All 224 squares of glory. All 70"x80" of fabricky goodness.  Well over 50 hours of work went into just making this section of the quilt: Cleaning the fabric, pressing it, cutting it, arranging the strips on the muslin, sewing the squares, pressing them, cutting them to size, then sewing them into columns, and finally into a quilt. 


it's really hard to get a picture of how big it actually is!
It's not perfect. In fact, as quilt making goes, it is indeed far from perfect. My columns are straight, but the rows zigzag a little. Or, a lot. But it's mine, and I made it. I'm really proud of that! My next step is to choose a backing/binding fabric, which I will need 6 yards of.  I better be on the lookout for JoAnn Fabric coupons!

1.23.2012

so that's how you do it?


I think I may have finally learned how to take a picture with my digital camera.  I learned how to adjust the settings, and I started taking pictures of... well, everything. I hope they keep getting better, I'm so close to posting my bags on Etsy!

12.27.2011

Whoops, there goes a month!

Ack, it's been too long since I've posted!  So much has happened in the past month, so I decided that I'm going to break it on down into a couple posts over the week, so I don't get carpel tunnel updating what's going on. First, let's chat about the quilt.  The last time I wrote, I mentioned that I had finished sewing all 224 squares... still an accomplishment that I'm proud of!

I brought the squares with me to my family's Thanksgiving dinner.  I asked everyone that was there to sign the back of a square, so that when I sewed it together, I'd have all of my family with me.
(Pause for loving moment).

Here are all the signed squares!  There are 15 total that will be inserted into the 14 columns of the quilt.  Last weekend, I started said columns and so far it's going quite well!  I have 6 columns of 16 squares completed so far (96 total!).  I'm hoping that I can actually finish sewing the top of the quilt this weekend, which would be awesome!  Once that is done, I'll have to choose a backer fabric for the quilt.  That means a trip to the fabric store for me, huzzaaaah!

Here's a picture showing how thrilled I am at my progress. The quilt is starting to look real!!! I can't believe that all of these pieces of fabric I cut so long ago are forming an actual quilt.  Also, it shows how many lemon squares I ate over the past month.  Good thing I went to the Y today.

11.21.2011

if at first you don't succeed, take a nap. then try again.

First off, I'd like to explain my cryptic brain rant that I said I would update 'tomorrow'. Unfortunately, tomorrow is now 6 days from tomorrow.  Wait... 6 days from then.  From the last post.  This post isn't clearing anything up so far. Let's try again.

FAIL
Last Wednesday night I decided to start tiling the back splash in our kitchen.  My goal was just to do the tiling behind our now non-existent stove. It took me about 3 hours to do it, but I did get it done.  Not as successfully as I'd like to, though.  All in all, about 43 tiles fell off the wall due to, A: bad tiling advice and B: bad mortar application.  After feeling sorry for myself and developing a migraine, I struck back.  I used my Dremmel tool to grind out the dried mortar and I hand applied the missing tiles to the wall.  Lou and I got an additional 8 square feet done tonight. I can't wait to get our project done, and to cook something on our new stove!
SUCCESS

I also got ALL ALL of the squares done for the quilt!  That's right.  I finished all 224 squares... THEY'RE ALL DONE.  I finished sewing the last of the squares on Friday night, and I just trimmed them all up last night.  I'm really excited that I accomplished this much so far.  Now, I'm ready to start sewing the rows and columns.  Pretty soon, it will start looking like a real quilt!  It's going to be such a fun winter project!
4 new wine bags, 224 squares!

A friend of mine (and also my former landlord) ((and also the nicest landlord I've ever had)) asked me if I could make her some wine bags for the holiday season coming up!  I'm really proud that I started cutting them out and sewing them together on Friday night.  I'm hoping that I can complete them tomorrow, and maybe bring them to her sometime this weekend.  

The reason why I was trying to get all of these things done before the weekend, was because I traveled down Washington DC!  It was a lot of fun.  We had great weather, we saw a ton of things around town (both by foot and by bike!) and ate amazing food.  I wish I had more time to browse around the museums and national monuments. I feel like I just was beginning to scratch the surface of the city, then all of the sudden it's time to leave and board the train going back home! I picked up a new book as well, and I'm hoping that I can incorporate some of it's philosophy into future blog posts!  

Well, that's an awfully long post, so I'll end it at this. You can do anything you put your mind to.  Especially when you have coffee.

11.10.2011

the greatest gift of all.

Today I was going to write a quick update aptly titled 200 down, 24 to go! with an picture of me holding a giant stack of sewed fabric.  But, my story quickly changed last night when Lou yelled up to me “Hey, you got a package in the mail from Jenny!”  First of all, I was doubled over in excitement that I actually got a package in the mail.  I think I did a little happy dance, but I can’t be sure of that.  Secondly, my thoughts instantly went to… did I forget anything at her house that she had to send back to me?


I retrieved the box and carefully opened it. And I literally, literally could feel tears of joy welling up in my eyes.  She had sent me memories: Fabrics, pictures and wonderful things, all from Audi’s house.  I immediately pulled out a small coffee creamer, and a note that read “One of gram’s coffee creamers (DO NOT put a carton on the table anymore!!!).  I laughed out loud as tears streamed down my face.  I dug deeper into the box and pulled out pictures: The ones that I used to stare at aimlessly in the hallway in between the bedrooms.  Deeper still, I found stacks of fabrics from around her house: The curtains from the guest bedroom, pillowcases from sleepovers and fabric from the armchair.

For about 20 or 30 minutes, I went through everything… reading and rereading notes that Jenny wrote to me, looking at pictures, feeling the fabric.  I’m pretty sure I was fantasizing about asking people over for coffee, seeing that I now possessed a prized creamer.   I felt like I was back in her house.  And that felt so nice.
 
Tonight I’ll hang up all the family pictures that Jenny sent to me in my art/sewing room, but only after I pour myself a cup of coffee, with half n’ half from my new creamer.  Twenty four squares will be made out of the fabric that she sent to me.  Call it a coincidence, but that’s one square for every one year that I got to spend with Audi.  Honestly, I don’t think it’s a coincidence at all.  I think there are other forces about.  I think it’s love. 

Let this be a lesson for everyone.  A simple thought or gesture, no matter how big or small, can lift a person’s spirits and (re)fill their heart with love, enthusiasm and faith.  What an incredible gift she gave to me, as I was struggling with anxiety and gradually loosing my faith in humanity.  Boy was I wrong about it all.