5.20.2015

past project: bathroom remodel!

So there was one glorious week during the 2014-2015 winter break where I decided that it would be a GREAT idea to remodel our en-suite bathroom. This decision was based solely on my inability to stay still, and my lack of something constructive to do... or to study. So I figured I'd show you my little (HUGE) project so that you may too, redo your bathroom if you feel crazy inspired enough to do it!

DAY1
Step 1: Make a list of everything that you need from the hardware store. This won't stop you from having to go back a second, third and fourth time, though.
Step 2: Using a chisel and hammer, rip the foe-black marble tile off of the wall and wonder why someone put it on the wall sporadically in the first place.
Step 3: Drain the ol' toilet, disassemble and store it in the tub whilst you work. Put a rag in the hole, so no sewer gas comes'a wafting in! While your at it, take out the medicine cabinet, too. It sucks.
Step 4: Using a crowbar and hammer, rip up the old cracked tile flooring.
Step 5: Don't lay down on the couch, because if you do...
Step 6: You'll have to take a fist-full of ibuprofen because you now you can't get up. Sad.
 

DAY2
Step 6: Repair the walls! Joint compound, joint tape, lots of drying time, and elbow grease to sand it down smooth. A small mouse sander helps.
Step 7: Prime the walls. You forgot to buy primer, so check the basement. Look! You have grey primer! Let's use that and pretend like it was your plan!
Step 8: Then apply 2 coats of the paint color of your choice. Take another fist full of ibuprofen before you go to sleep.
Step 9: Realize that the medicine cabinet you threw out... they don't sell that size in the stores anymore. Custom purchase it and blow your budget! Cry a little.  


DAY3
Step 10: Ask your Dad for help.
Step 11: Rewire the electrical sockets. Be sure to SHUT THE BREAKERS OFF. (Twice now we thought they were off and then POP!)
Step 12: Along with him, cut all of the 9x12" tiles to size, mix the mortar and lay the tiles.


DAY4: 
Step 13: Grout the tiles. This is pretty much all you can do since you can't step on the floor, so...
Step 14: HAVE A BEER.

DAY5: 
Step 15: Reinstall the toilet with all new inner workings. Man, that's a nice flush.
Step 16: You know all that leftover glass tile you had from your kitchen? Why not make a back splash in the bathroom?
Step 17: Regret this decision, you just made more work for yourself.

DAY6: 
Step 18: Install that new custom medicine cabinet, and hope that it holds f***ing gold from the trouble you went through to find it.
Step 19: Make some minor adjustments to the decor, after all, why not have stuff look niiiiiiice?
Step 20: Marvel at your work and vow never to do it again, until, that is, you do it again.

5.18.2015

over-over-overdue

Like the title says, over-over-overdue!

I'm taking my national board exams tomorrow. I already completed 4 of them (clinical exam, jurisprudence, local anesthesia and CDCA/NERB). Once I complete tomorrows 350 question grueling exam, I will be OFFICIALLY DONE with my understudies to become a dental hygienist. After that, alls I need is a license to practice! Which means...


I SHALL RETURN VALIANTLY TO THE WORLD OF ARTS, CRAFTS, FREE-TIME AND GENERAL RELAXATION! HUZZAH!

LOOK! Here I am contemplating things! Like, what kind of art project will I start on Wednesday? Do these glasses magically transport me to 1980 when I'm asleep? And, if I hold this pose long enough, will people think that I'm actually contemplating something?

9.18.2014

the spirit.

Time is going by too quickly if you ask me. I tried desperately to go to sleep early tonight since I've been feeling under the weather for about... oh 3 weeks (COUGH!) and a thousand thoughts were going through my mind, mostly all related to fun dental things. Did I sort through all of my papers for my rotation tomorrow? did I finish all of my journal entries? do I have all of my things in the car that I need for tomorrow? should I have stayed up later to study? will I remember everything from oral path today? can I make it through another week of clinic with another 5 quizzes next week plus tutoring others? and so on... and so on... and so on... 

I have been so wrapped up lately in everything surrounding school and attempting to excel in the field, that I've completely neglected my life. I've neglected friends. (Sorry friends, I promise to be fun again.) I've neglected my fun little art blog. And I've neglected writing. (HA. I should clarify, I've neglected writing about art, I've written TONS of papers, some of which were friggin' unnecessary to write.) Needless to say, I kinda lost the spirit. My spirit. That made me sad.

So instead of going to bed depressed, I decided to get up and write a little damnit. And craft a little, damnit! Because why not? As much as I love school right now, I need to distance myself both mentally and physically. So I'm going to aim to make one night a week my craft night.

Tonight's project? 
Modifying a glitter painting I did a while back with a cast of my teeth from Perio Lab.  OK. I said I would try to distance myself. I'M TRYING, OK?! Back off mang. It's a work in progress. I'm not sure where it's going, but it's better than going nowhere.


In the meantime, enjoy this note from my dad to the tooth fairy from when I was a kid. I'm not sure which tooth was my lucky tooth. We may never know.


2.14.2014

exciting news time!

Back in June of 2013, I sent The Gallery Collection an original watercolor of mine to be in the running to win a $10,000 scholarship in their 7th Annual Create-A-Greeting-Card contest. 

AND GUESS WHAT?
 
 I'M ONE OF THE 203 FINALISTS!!! 

Check it out HERE on their website, I am beyond so THRILLED!!!

UPDATE! I DIDN'T WIN AT ALL AND WAS TERRIBLY DISAPPOINTMENT FOR APPROX. ONE DAY. 

1.10.2014

working for the janey company

Over the past few weeks and/or months (who knows because time has been flying!) I've been working for my dear friend Avi who recently created The JANEY Company. I've been a maker for sure! In general, I sew together Avi's designs and creations, and my time off from school has been allowing me to make more than usual! I just finished 16 of them: 14 adult ones, and two kids ones. I think they came out pretty darn snazzy! It's been an awesome learning experience, as it keeps evolving from batch-to-batch! Head over to the website to check out the beautiful hand-crafted hooded scarves made from gently loved sweaters. You can also head over to the Etsy shop to check out items that are for sale! I'm proud to be a part of a locally sustainable company, and I'm hoping that in the future, I can continue to be a maker for the JANEY company!

Photo is courtesy of The JANEY Company. I made this one!

10.25.2013

spooky skeleton: college work

So in my absence of actually creating works of art, I decided to donate some of the things that I did as anatomical studies in college. The first college. You remember, the sculpture, the sewing....? The stained glass? ...No? Well, it's been awhile since I've posted, so I don't blame you for forgetting.

I might try to post a past project about once a week since well... you know... I don't have much time for anything else but fulcruming, rock n' rolling and probing. Now that I write that out, I realize that you probably have no idea what I'm talking about. Ah, the Dental Hygiene life.


I think I did this skull back in... 2004? So almost a good 10 years ago. It's literally been sitting in my parents basement since then, freaking them out on occasion when they need to go get a gravy boat or a Christmas wreath, then BAM! There's a skull IN YO' FACE. I had almost completely forgotten about it, until one day I was thinking... WAIT A DANG SECOND. I need to know all of these muscles allllllll over again, just like I needed to know before... so why not pass along the skull so people can study from it? So it's going to my Dental Anatomy teacher in the hopes that people get a kick out of it. It's not going with the glasses though. Those are mine. 

did I accidentally sculpt duck face?


9.17.2013

IT HAS BEEN THREE MONTHS.

3 MONTHS SINCE I POSTED LAST. That's just downright sad. Between the four summer session classes that I took between May and August, preparing for Dental Hygiene school, actually being in Dental Hygiene school, and trying to maintain a somewhat normal sense of communication with family and friends, it didn't really leave me time for much more. Except for eating and sleeping. And those two things I'll NEVER give up. HA! I'm working on two small (SMALL) projects right now for a friend that I think I'll barely be able to finish by the deadline. And by barely, it means stay up the night before until I finish it all. And I can't post pictures, since it's kinda-sorta a surprise.

I ended up sending off the resin cast of my hand to the company who was going investigate making custom fitted nitrile gloves. I haven't heard a word from them since I sent it in June. Not a "we got it!" or a "YEP!" or a "NOPE!" when it comes to actually making it. Oh well. I tried, right? So far, I can manage with the XS gloves on my left hand just fine. It just takes me an hour to put the glove on.

As for art... how's about practicing with my dental instruments every night? NOW THAT'S ART. My gosh, I never realized the precision involved with instrumentation! It's a thing of beauty. But hey, if I trained my hands to sculpt, I can train them to un-sculpt some calculus from teeth.

That's all for now. No pictures to post. No thrilling stories of crafting. Maybe someday soon, I promise. I'll be sure to keep my camera handy when I pull the all-nighter at the end of the month. 


6.10.2013

still not done?

It has been one week and I STILL have not completed the second part of that mold. WHAT'S THE HOLDUP JILL? I wish I had a good excuse, other than everything else going on. Maybe I can squeeze in some time tonight to work on it.

6.05.2013

MOTHER mold

I worked hard to get the first part of the plaster mother mold finished on Monday night. I built up a bed  underneath my rubber mold so I could work on it horizontally instead of vertically. I WISH I DID THIS IN COLLEGE. Because it was so much f***ing easier to do than working on it vertically! I built up cut walls that extended about... oh, one inch or so from the edge of rubber mold, and made a running key. (This will ensure that the second part of the plaster mold will align and lock into the first part. HUZZAH!) I mixed by first batch of plaster and applied the first "splash" coat: It's just a super even, thorough coat of plaster. Once it hardened, I started making my hemp birds-nests.

You're probably like... dafuq? Check it. I mixed up my second batch of plaster, dipped one of these 'birds-nests' into the plaster, then applied it to the mold. This will give the mold a bit more girth and strength. I actually had to mix up a third batch because the birds-nests soaked up so much moisture from the plaster!
top, l: plastalina cut walls w/keys. top, r: plaster mold setting. bottom, l: side one, finished! bottom, r: another view!
After about an hour, I stood the mold up, got rid of the plastalina cut walls, and cleaned up the edges of the plaster mold.

Yesterday, I was going to do the second half of the mold, but I was working on homework, then ate steak and lost all of my ability to function like a human being. Tonight, I need to make sure to apply A LOT of coats of Muphy's Oil Soap to the edge of the existing plaster mold before I start the second part. This will put a barrier in between the two parts of the mold, and they won't stick together.

VERY. IMPORTANT. STEP.

Then, I'll throw on the second part of the mold and be done! With the mold that is. I still need to cast in resin. I'm hoping to do that one of these nights.

So little time.

6.03.2013

rubber molds in the summer heat

So I really didn't document the first part of my mold making process, mostly due to the fact that I had one hand sunk in dental grade alginate. It's hard to maneuver a camera when you have a box attached to you. Ha! That sentence sounded horrible.

But I'm so glad I wrote that entry, because luckily, my college studio-mate pointed out that rubber was a suitable mold to cast resin in, not plaster. So it was back to the drawing board! I had to revise my two-part plaster mold into a two-part rubber mold. Slightly more complicated, but hey... I love mold making, so the challenge was accepted.

So back to Blick I went on Friday, and picked up Smooth-On Rebound 25 rubber and plastalina . But before I could strap on my gloves and mix the rubber, I had to do a little thinking... was I going to just paint the rubber on when the plaster hand was free standing? Or should I work a little more on my prep and make a pour-able mold? The pour-able mold won out by a landslide. Yes, it's a ton more prep-work and there is a slight risk that your mold will bust a leak and rubber will go spewing out all over the place... but the results and the stability of the mold would be worth it. What can I say. I'm a rebel risk taker. Not.

the mold, plastalina and aluminum with keys
On Saturday, I built up a bed of plastalina (it's an oil based clay that doesn't dry or shrink) to rest the hand on in a horizontal position. The one benefit of working with plastalina on a 90+ degree day is that it gets super pliable and soft with the heat. Then I used some aluminum flashing to make a quick and easy flex mold. It's so much easier than cutting and clamping wood together, fo realz. I used the plastalina to fill in the gaps, and to mask the bottom 50% of the plaster hand. Then, I pressed a couple marbles into the clay, and made some indentations to make keys. Keys are super important, because they will ensure that the mold aligns properly when you're ready to cast. Sounds easy, but that prep work literally took me five hours.
I sprayed the mold quickly with Ease Release so that the rubber wouldn't adhere to the plaster hand. Then it was all measuing, mixing and pouring from there! The Rebound 25 is a great 1A:1B ratio, so it takes the guesswork out of measuring. The first part of the mold came out better than I expected, so Saturday was a win in my book!
pour #1 after it had set for 12 hrs. ready to de-mold!
top left: before removing plastalina. top right: after. bottom: rubber with keys clearly a success!
On Sunday, I completed the second pour of rubber. I basically did the same steps all over again... built up a bed of plastalina, secured the aluminum flex mold, mix, pour, wait. When the rubber had set, I stood the hand/rubber mold up. I noticed that all of the plaster on the base of the hand wasn't covered, so I decided to mix a small batch of rubber and cover it up. Totally worth it in my books. I'll add some pics of that with my next post.

Today I'm hoping to make the first 1/2 of the plaster mother mold. Wish me luck!

5.18.2013

my first real craft show!

I had a great time at my first real craft show! I brought along 40 wine bags, 4 tie-purses, some poof ball flowers and vases that I made for the wedding, and two small paintings which you might remember: abcdef fail and anxiety.

A lot of people made me feel so great: Compliments on how clever my ideas really made me smile. It was wonderful to hear people admiring my sewing and my bags. AAAAAAAAND (drum-roll PLZ....) I SOLD 4 BAGS! I'm so glad I made more bags and spent time preparing as much as I could. I did learn a couple of things from my craft show experience.
  • I need sign. I picked up foam-core to make one the other night, and I decided that it wouldn't look professional enough, so I didn't bother making one. I need to make one like I made for Bamboula. One that says something like CRAFTS MADE FROM TIES! or CREATIONS FROM TIES! or something like that.
  • I wonder if I'm not being confident enough. I was so happy to talk to visitors at the table, that I didn't really "sell myself" like other people were. Is that a key to success?
  • It would have been nice to have someone there for a couple minutes so I could have left to use the bathroom, or to walk around to see other peoples things. At one point, I had to pee so bad that I left a note that said BE BACK IN A MINUTE! and asked the couple next to me if they wouldn't mind keeping an eye out for me. 
All in all it was a great day for a great cause. I hope I can do more fairs in the future, and maybe with some luck, I can have some more success!

5.13.2013

more F'in work

I do have some concerns about my giant F. I really needed the F to be lightweight, because the wall it's destined to hang on backs up to a shower. So I couldn't make it too heavy and risk it A: ripping off the wall with smaller screws, or B: having longer screws penetrate into the shower. Luckily, it's still light as a feather, so a couple of strategically placed small picture hanging hooks should work just fine.My other concern is having the F stay together. I tried as best as I could to execute it F'in properly. I just hope it doesn't crumble apart once it's finally up on the wall.

Last night I lightly sanded and primed the F. I'm hoping that I can get a coat of yellow paint on it some night this week. With my now part-time work schedule (eek) and part-time school schedule (EEK), I have to find a new balance when it comes to my craft-work-school time. Eek.

5.11.2013

bag n' bread

When I was putting prices on all of my wine bags, I noticed one lonely half-finished tie purse in my bin that I started last year and just never finished. I had some free procraftination time today, so now the lonely half-finished tie purse is now a non-lonely ALL FINISHED tie purse! All I had to do was finish the inside of the front panel, create the back panel, and sew them to the already finished straps. It made for a great morning of work while I was cleaning up the house. The cat is shedding, and it constantly looks like a yeti exploded in here. Gross.
 
In other Saturday news, I made Lou's Dad famous bread, and I thought I would share it since I finally got to make it this afternoon. It's a super simple recipe that requires only four ingredients. I used a spicy salt and whole wheat flour. Yum!
 3 cups flour
1-1/2 tsp salt
2-1/4 tsp yeast
1-1/2 warm water

Spray the inside of a large bowl with cooking spray. Sift all the dry ingredients into the bowl, then add the warm water. Mix until combined. Cover with plastic wrap and let it rise in a warm spot for four hours. Turn the dough onto an oiled surface and cover again for thirty minutes. While rising again, preheat your oven and dutch oven to 450°. Add dough, cover and bake for thirty minutes. Take the lid off the Dutch oven and bake for another ten minutes. Let cool on a cooling rack. Or devour immediately like I do. 

5.10.2013

F! F! F! F!

Lord knows I haven't been F'in around lately. I've been busy as F. Why the F am I talking like this? Because I have a big F'in F I'm working on. NO. SERIOUSLY. I'm making a 40" tall wall-hanging F. My sister was looking for a giant F (the first initial of her last name, not an odd ode to F) for their den, but she couldn't find something that was F'in big enough. And most were F'in expensive. So I told her I'd give an F if she'd like me to.

Onto the F'in details! First of all, I had a lot of help from an amazing tutorial over at Green Zebra Crafts. I used some different materials which I'll explain below. You know, my original idea was to use flexible wire mesh covered with paper mache. Which sounds like a horribly F'in tedious idea. Idea fail.

a giant paper F
First, I literally needed to print out a giant F. Microsoft Word didn't quite work for me, so I went into MS Paint to create my 40" tall F. Here's a F'in tip though: DO NOT make your letter in solid black. Adjust the font to a light grey tone, and print it on scrap paper so you're not wasting ink and good paper on something you're going to throw away.

two cardboard F's
Once the F was printed, taped together and trimmed of excess paper, I traced F out on enough cardboard to make two F's. Regular ol' scotch-tape worked just fine, but I think masking tape would have worked better to join all the F'in F pieces together.

Then it was onto making the two flat F's into a 3D F. Out of the F'in scraps of cardboard, I cut 1" wide strips and joined them together into a massively long 1" wide strip. I took my time and affixed this strip to the interior of the bottom F with hot glue. I used making tape to sure-up the seams on the outside. Then, it was onto attaching the top F. This I did just out of masking tape. A LOT OF MASKING TAPE.

VOILA! I had myself an F'in giant 3D F.
Crystal at Green Zebra Crafts then covered her letter with paper mache. I was on the verge of going to buy some when a 1/2 used gallon of joint compound caught my eye. F'IN BINGO. Right now I have two F'in coats of the joint compound on the front and one on the back. This weekend I'm hoping to get it completely F'in covered and textured, and paint it a glorious F'in yellow.

finished!

I can't believe how productive I've been the past couple of nights! I completely finished all 23 wine bags. ALL 23 BAGS! Each one is stamped with my little "Nodyl's Noodles" stamp, and has a cute little tag with the price. Over the weekend, I'd like to make a price sheet that I can frame for my crafter table. I have a really nice black tablecloth to use, too. I'm so excited, I really hope I can make new friends and customers next weekend!

FINALLY SOME PICTURES!
I didn't realize how cray I look in this picture.

5.09.2013

more bags, more glory (part deux)

On Monday and Tuesday I began almost obsessively working on new wine bags to (HOPEFULLY!) sell at the Arc Mercer 2012 Walk-A-Thon taking place on Saturday May 18th at Veterans Park in Hamilton Township. NJ. While I didn't get my original goals done on Monday, I sure blew through them on Tuesday night. Here's what I have in the works:

23 NEW WINE BAGS!
46 pieces of fabric cut and pressed
736 inches (or over 61 feet!) of ties cut into 16" pieces for all 23 bags
2 tie-handles sewed onto each of the bags
excess pieces of tie from handles trimmed and saved to make the tiny tie for each bag
all 23 bags ironed and ready for the final sew

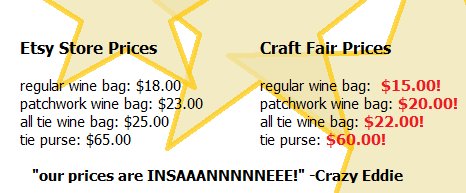
Also, I think I'm going to do special pricing from now on whenever I do a craft fair. Since Etsy charges the seller per transaction and per item post, I try to build those small costs into each bag. Since I'll be interacting with my (POTENTIAL!) customers one-on-one, I can drop the prices a little.


Anyone who grew up in the 80's and lived near New York remembers Crazy Eddie! I'm going to be the Crazy Eddie of wine bags.

5.08.2013

a little help from my friends (and major corporations)

So with the prospect of going back to school for Dental Hygiene, I ran into a little bit of what I'd call a 'mental roadblock'. While I know that I am perfectly capable and able to mentally and physically complete the program, I didn't want others (that being professors or classmates) to think that I physically wouldn't be able to because of my left hand. Nothing has ever really held me back (except ring around the rosie) and this won't either: I can sculpt, paint, type, sew, sign ASL and do most anything anyone else can do. Maybe a little better sometimes. I'm not bragging. This is just a fact. The only thing that I could foresee being a quote-unquote 'problem' was having the disposable Nitrile gloves not fit me properly. So naturally I did what any other person would do.

I started reaching out to every single Nitrile glove manufacturers and distributors I could find in the USA to see if they in any way could help me in my quest to find or make a custom fitted disposable Nitrile glove. So far, I've contacted 13 companies. Two companies emailed me back and said that they wouldn't be able to help. Which is totally fine, I'd rather have someone respond with an answer than not respond at all. One company representative called me to explain that they did not actually produce the gloves, but that she would forward my inquiry to companies that she knew of. (She also told me, good for you for following your dreams and not letting anything hold you back. TEAR!)

One company emailed me back to say "I hope that we can help you with your needs. I will consult with our team to see if there is a glove we can dip for you."

WAIT.
WHAT?
SOMEONE CAN HELP?

ER.
MAH.
GERD.

Thus begins my quest: To dig deep back into my mold making routes to make a perfect resin cast of my left hand to send to this generous company.

On Sunday, I made an alginate mold of my hand and a perfect plaster cast. From here, I will make a simple two-piece plater mold of the cast so I will be able to cast multiple hands in resin. I had forgotten how much fun it is to make a mold.. the materials, the preparation, the anticipation of cutting the alginate away to see how the cast came out. It's bliss.

Also, I need to get on my game and take some pictures. These pictureless posts are lame.

5.06.2013

more bags, more glory

It's been awhile since I've sewed some wine bags. But I have to get on my game, because 12 days from now I'll be setting up my CRAFTY BOOTH for ARC Mercer in Veteran's Park with only 18 wine bags! My goal is to make another 12-22 to bring my total to either 30 or 40.  I think I can do it between my other projects going on. I think it's time for me to realistically set goals again, folks.

OK. By the end of tonight I'd like to have all of the ties for the bags' straps cut out, all of the fabric cut out, and all of the straps pinned to the fabric. I think that's a fair goal to set for myself.

Here are the projects I have going on right now:
- Make a 40" tall wall-hanging F. (I'll explain later)
- Make a mold and resin cast of my left hand (... I'll explain later)
- Make 12-22 new wine bags to sell at craft fair
- Update and work on my collaborative blog for Moxy Murals with my fellow artist Mrs. Brown!

I'm hoping that I can create a post a day detailing some of the other projects I've been working on. There's a lot going on in Nodyl's world at the moment!

4.26.2013

many things, many things.

Many things. What has been going on in my life over the past couple months? MANY THINGS. And all are such good things. I've gotten married. I've been on a lovely honeymoon with my future husband. I've been accepted to go back to school to study Dental Hygiene. Spring has sprung. Life is good. But while much of life happened, I put a temporary hold on my art projects. Much of that will be changing as I dive deeper into this new chapter of my life.

But for now, check out what I'll be up to on May 18th!!
I will be selling and displaying my wine bags and tie purses at the 2013 Arc Mercer Walk-a-Thon, located at Veterans Park in Hamilton Twp. NJ!!! Arc Mercer is a non-profit organization that provides a range of quality services for individuals with developmental disabilities. You can support Arc Mercer by participating in the Walk-a-Thon: Call Ms. Kelly Jiras at 609-406-0181 ext. 146

I hope to see you there, if not, just check back later for fun pictures of the event on my blog!

2.27.2013

culmination

It seriously took me a couple days to put my thoughts together to write this post. You could say this post entitled culmination is the culmination of thoughts, but it's mostly about the culmination of one of my most difficult projects. Actually, it's all about the culmination of my most difficult project. I never thought I could use that word 4 TIMES in the same post!

I FINISHED THE QUILT.
That's right... The quilt is finished! Der Quilt ist fertig! El quilt está terminado!

As you might recall, in my last quilt post I noted that I needed to hand stitch the open seam closed to the backing fabric and officially 'sign' the quilt. I began by pinning the binding in place with my super long 1-1/2" flat quilting pins. Then, since I'm not a very good hand-stitcher, I thought it would be wise to do some research on which stitch would be best to finish the open seam. (PS: Typing which stitch would be best is just as hard as saying it three times fast.) I ended up choosing the blind stitch thanks to the awesome instructions and description on this blog called Quilting in the Rain. <--- If you have a couple of minutes, please check out her blog: It's unbelievable, plus it's so bright and cheery!

It look me a little while to find my stride when it came to blind stitching, but over the course of a week, I diligently sewed the night away. I pricked my fingers.. and legs... and arms a couple of times, thanks to those super long 1-1/2" quilting pins. But with every stitch, I knew that I was getting closer and closer to finishing my first quilt.

On Saturday night, I sat down on the couch and began stitching away, knowing that within a couple of hours my project would be finished. I thought about all the work that went into making it. I thought each strip of fabric that I pieced together, sewing them onto the muslin blocks, pressing them flat and fashioning them all into rows and columns. I thought about how I almost convinced myself to send it out to get finished, and the moment it dawned on me to just give it my best shot. I thought about all of my family, and the signatures that they added to different blocks of fabric. And then I thought about the one signature that was missing. Adelaide Ruess. 

So, I added it myself. 
I was emotionally and physically exhausted after finishing it, and ended up falling asleep on the couch wrapped up in my new quilt. I was so happy that I accomplished my goal of making a quilt, but I was also quite sad. It's cruel to me that I can't show it to Audi. But in my heart, somehow I think that she has seen it. I hope she's as proud of me as I am of myself.

If you'd like to look back at all of the quilt related posts, you can find them right here.